🖥⚙️CWWK - Serveur Debian 13
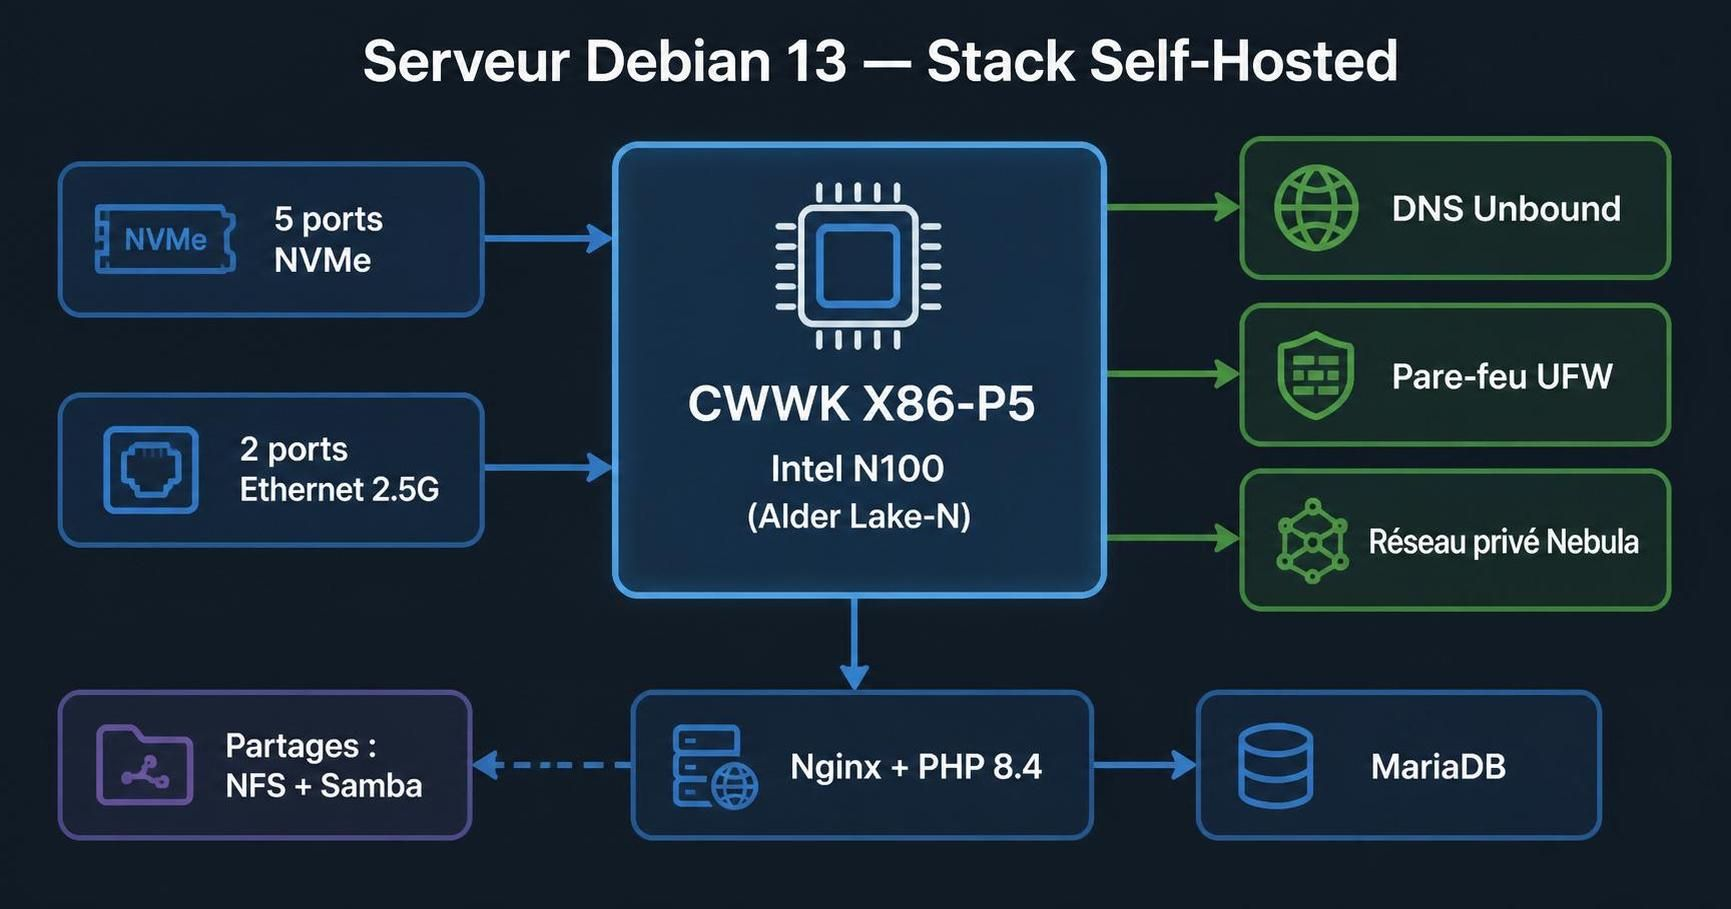
CWWK carte mère x86-P5 sous processeur Alder Lake-N + module de 4 ports NVMe PCIe x1 + 2 ports Ethernet 2.5 Gigabit avec des fonctions Wake On Lan et de démarrage automatique après reprise du courant, ou programmable. Un port M.2 pour ajouter un module Wi-Fi
Description matériel CWWK X86-P5
CWWK X86-P5 Intel N100 Alder Lake-N + 5 ports NVMe + 2 ports Ethernet 2.5Ghz
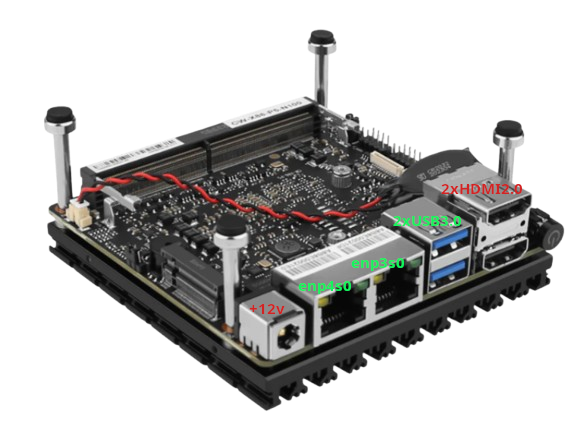
Serveur Debian 13
Installation avec clé USB ISO
Connecter la machine cwwk sur le réseau
Brancher un clavier USB
Connecter un écran HDMI
Insérer clé USB contenant image ISO debian-13.1.0-amd64-netinst.iso
Brancher le jack d’alimentation
Accès au BIOS par touche clavier SUPPR
Dans l’onglet “Boot” –> Boot Option #1 [USB Device]
Touche F10 pour sauver
Installation debian
Réseau: enp3s0
Machine : cwwk
root : rtyuiop (temporaire)
yick : yick49 (temporaire)
Disque NVMe 128Go /dev/nvme0n1
Partitions LVM avec home séparé et 100Go utilisé
- Serveur SSH
- Utilitaires usuels du système
La machine reboot à la fin de l’installation
Se connecter avec l’utilisateur “yick”
Relever l’adresse ip : ip a , exemple 192.168.0.205
On peut également se connecter via ssh : ssh yick@192.168.0.205
Passer en su , installer sudo
1
2
3
su
apt install sudo
echo "yick     ALL=(ALL) NOPASSWD: ALL" >> /etc/sudoers.d/yick
Les services actifs
1
2
3
4
5
6
7
8
9
10
11
12
13
14
15
16
17
18
systemctl list-units --type=service --state=running

  UNIT                      LOAD   ACTIVE SUB     DESCRIPTION
  cron.service              loaded active running Regular background program processing daemon
  dbus.service              loaded active running D-Bus System Message Bus
  getty@tty1.service        loaded active running Getty on tty1
  ssh.service               loaded active running OpenBSD Secure Shell server
  systemd-journald.service  loaded active running Journal Service
  systemd-logind.service    loaded active running User Login Management
  systemd-timesyncd.service loaded active running Network Time Synchronization
  systemd-udevd.service     loaded active running Rule-based Manager for Device Events and Files
  user@1000.service         loaded active running User Manager for UID 1000

Legend: LOAD   → Reflects whether the unit definition was properly loaded.
        ACTIVE → The high-level unit activation state, i.e. generalization of SUB.
        SUB    → The low-level unit activation state, values depend on unit type.

9 loaded units listed.
Interface Réseau enp3s0
Ip V4 statiques
configurer une adresse IPv4 en statique
1
nano /etc/network/interfaces
1
2
3
4
5
6
7
8
9
10
11
12
13
14
15
16
# This file describes the network interfaces available on your system
# and how to activate them. For more information, see interfaces(5).

source /etc/network/interfaces.d/*

# The loopback network interface
auto lo
iface lo inet loopback

# The primary network interface
allow-hotplug enp3s0
# iface enp3s0 inet dhcp
iface enp3s0 inet static
    address 192.168.0.205
    netmask 255.255.255.0
    gateway 192.168.0.254
Fichier résolution DNS /etc/resolv.conf
1
2
3
4
5
6
# Generated by dhcpcd from enp3s0.dhcp, enp3s0.ra
# /etc/resolv.conf.head can replace this line
nameserver 192.168.0.254
nameserver 1.1.1.1
nameserver fd0f:ee:b0::1
# /etc/resolv.conf.tail can replace this line
Redémarrer l’interface
1
sudo systemctl restart networking
IP V6 DHCP (DEFAUT)
Configuration /etc/network/interfaces
1
iface enp3s0 inet6 dhcp
Se connecter sur la nouvelle adresse ip
1
ssh yick@192.168.0.205
Modifier les mots de passe “root” et utilisateur “yick”
Hostname + Date et heure + Groupe
Hostname Commande : hostnamectl
1
2
3
4
5
6
7
8
9
10
11
12
13
14
15
  Static hostname: alder
       Icon name: computer-desktop
         Chassis: desktop 🖥️
      Machine ID: 0ac76f260fac46de811dc3bdb9248530
         Boot ID: a81a13bbcbcb440dbc876d5dab9623a1
    Product UUID: 03000200-0400-0500-0006-000700080009
Operating System: Debian GNU/Linux 13 (trixie)
          Kernel: Linux 6.12.90+deb13.1-amd64
    Architecture: x86-64
 Hardware Vendor: Default string
  Hardware Model: Default string
 Hardware Serial: Default string
Firmware Version: 5.27
   Firmware Date: Wed 2024-06-26
    Firmware Age: 1y 11month 1w
Date et heure Commande timedatectl
1
2
3
4
5
6
7
               Local time: mer. 2026-06-03 21:07:43 CEST
           Universal time: mer. 2026-06-03 19:07:43 UTC
                 RTC time: mer. 2026-06-03 19:07:43
                Time zone: Europe/Paris (CEST, +0200)
System clock synchronized: yes
              NTP service: active
          RTC in local TZ: no
Groupe “users”
Vérifier si utilisateur appartient au groupe “users” : id yick
1
uid=1000(yick) gid=1000(yick) groupes=1000(yick),24(cdrom),25(floppy),29(audio),30(dip),44(video),46(plugdev),100(users),101(netdev)
Si non appartenance, exécuter : sudo usermod -a -G users $USER
Pour visualiser tous les messages de journal, ajouter l’utilisateur au groupe existant adm
1
sudo usermod -a -G adm $USER
OpenSSH, clé et script

OpenSSH
Générer une paire de clé sur l'ordinateur de bureau PC1
Générer une paire de clé curve25519-sha256 (ECDH avec Curve25519 et SHA2) pour une liaison SSH avec le serveur.
1
2
ssh-keygen -t ed25519 -o -a 100 -f ~/.ssh/yick-ed25519
chmod 600 /home/yann/.ssh/yick-ed25519
Envoyer les clés publiques sur le serveur yick
1
ssh-copy-id -i ~/.ssh/yick-ed25519.pub yick@192.168.0.205
On se connecte sur le serveur debian 12
1
ssh yick@192.168.0.205
Ajouter la configuration serveur SSH
1
sudo nano /etc/ssh/sshd_config.d/10-yick.conf
Ajout
1
2
Port = 55205
PasswordAuthentication no
Relancer le serveur
1
sudo systemctl restart sshd
Test connexion
1
ssh -p 55205 -i ~/.ssh/yick-ed25519 yick@192.168.0.205
Utilitaires + Historique ligne de commande + Motd
Installer utilitaires
1
sudo apt install rsync curl tmux jq figlet git tree borgbackup nmap ldap-utils ncdu imagemagick
Ajoutez la recherche d’historique de la ligne de commande au terminal
Se connecter en utilisateur debian
Tapez un début de commande précédent, puis utilisez shift + up (flèche haut) pour rechercher l’historique filtré avec le début de la commande.
1
2
3
# Global, tout utilisateur
echo '"\e[1;2A": history-search-backward' | sudo tee -a /etc/inputrc
echo '"\e[1;2B": history-search-forward' | sudo tee -a /etc/inputrc
Motd
Effacer et créer motd
1
sudo rm /etc/motd && sudo nano /etc/motd
1
2
3
4
5
6
7
8
9
10
11
12
                      _
  __ __ __ ____ __ __| |__
 / _|\ V  V /\ V  V /| / /
 \__| \_/\_/  \_/\_/ |_\_\
  ___        _     _               _  ____
 |   \  ___ | |__ (_) __ _  _ _   / ||__ /
 | |) |/ -_)| '_ \| |/ _` || ' \  | | |_ \
 |___/ \___||_.__/|_|\__,_||_||_| |_||___/
  _  ___  ___     _   __  ___     __     ___  __   ___
 / |/ _ \|_  )   / | / / ( _ )   /  \   |_  )/  \ | __|
 | |\_, / / /  _ | |/ _ \/ _ \ _| () |_  / /| () ||__ \
 |_| /_/ /___|(_)|_|\___/\___/(_)\__/(_)/___|\__/ |___/
Liens ln
sur home
1
2
ln -s /sharenfs sharenfs
ln -s /sharenfs/scripts scripts
.bashrc et alias
Dans le fichier .bashrc, on se réfère au fichier nommé ~/.bash_aliases pour les alias
~/.bash_aliases
1
2
3
4
5
6
7
8
9
10
11
12
13
14
alias acme.sh='/home/yick/.acme.sh/acme.sh'
alias borglist='$HOME/scripts/borglist.sh'
alias etat='$HOME/scripts/etat_des_lieux_cwwk.sh > /sharenfs/rnmkcy/site/etat_cwwk.txt'
alias gencert='$HOME/scripts/gencert.sh'
alias journal='sudo SYSTEMD_LESS=FRXMK journalctl'
alias ls='ls --color=auto'
alias maj='sudo apt update && sudo apt upgrade -y'
alias memory='sudo python3 /sharenfs/scripts/ps_mem.py'
alias nebul='echo "sudo nmap -T4 -sP 10.139.110.0/24" && sudo nmap -T4 -sP 10.139.110.0/24'
alias nebulaclient='cd $HOME/sharenfs/nebula-v2/; ./client-nebula-v2.sh'
alias nmap10='echo "sudo nmap -T4 -sP 192.168.10.0/24" && sudo nmap -T4 -sP 192.168.10.0/24'
alias nmapl='echo "sudo nmap -T4 -sP 192.168.0.0/24" && sudo nmap -T4 -sP 192.168.0.0/24'
alias service='systemctl list-units --type=service --state=running'
alias sshm='$HOME/scripts/ssh-manager.sh'
Après ajout ou suppression alias, ne pas oublier la commande
source ~/.bash_aliases
Configuration réseau
Mettre en ip static l’adresse IPV6 interface
enp3s0et ajouteraccept_ra 1
1
nano /etc/network/interfaces
Ajouter le contenu suivant
1
2
3
4
5
6
7
8
9
10
11
12
13
14
15
16
17
18
19
20
21
22
23
24
# This file describes the network interfaces available on your system
# and how to activate them. For more information, see interfaces(5).

source /etc/network/interfaces.d/*

# The loopback network interface
auto lo
iface lo inet loopback

# The primary network interface
allow-hotplug enp3s0
#iface enp3s0 inet dhcp
iface enp3s0 inet static
    address 192.168.0.205
    netmask 255.255.255.0
    gateway 192.168.0.254

iface enp3s0 inet6 static
    address 2a01:e0a:95a:e2f0:aab8:e0ff:fe04:ec45/64
    accept_ra 1

auto enp4s0
iface enp4s0 inet static
    address 192.168.10.100/24
Le inet6 fe80::…/64 scope link vient du système (link-local). La partie 2a01:e0a:95a:e2f0::/64 correspond au préfixe annoncé par la box, et l’interface a formé l’ID de la machine à partir de son identifiant (souvent lié à l’adresse MAC) — ce n’est donc pas “définie pendant l’installation” de façon statique, mais apparue après via auto-config IPv6.
Problème IPV6
yann@yannig:~$ ping -6 -c3 rnmkcy.eu
1
2
3
4
PING rnmkcy.eu (2a01:e0a:95a:e2f0:aab8:e0ff:fe04:ec45) 56 data bytes

--- rnmkcy.eu ping statistics ---
3 packets transmitted, 0 received, 100% packet loss, time 2054ms
yann@yannig:~$ ping -4 -c3 rnmkcy.eu
1
2
3
4
5
6
7
8
PING rnmkcy.eu (82.64.18.243) 56(84) bytes of data.
64 bytes from 82-64-18-243.subs.proxad.net (82.64.18.243): icmp_seq=1 ttl=47 time=11.8 ms
64 bytes from 82-64-18-243.subs.proxad.net (82.64.18.243): icmp_seq=2 ttl=47 time=11.9 ms
64 bytes from 82-64-18-243.subs.proxad.net (82.64.18.243): icmp_seq=3 ttl=47 time=11.9 ms

--- rnmkcy.eu ping statistics ---
3 packets transmitted, 3 received, 0% packet loss, time 2002ms
rtt min/avg/max/mdev = 11.838/11.865/11.885/0.019 ms
traceroute -6 rnmkcy.eu
1
2
3
4
5
6
7
8
9
10
11
12
13
14
15
16
17
18
19
20
traceroute to rnmkcy.eu (2a01:e0a:95a:e2f0:aab8:e0ff:fe04:ec45), 30 hops max, 80 byte packets
 1  _gateway (2001:41d0:305:2100::1)  0.209 ms  0.138 ms  0.099 ms
 2  fd00::ffe (fd00::ffe)  0.320 ms  0.282 ms  0.248 ms
 3  2001:41d0:0:1:3::baff (2001:41d0:0:1:3::baff)  0.262 ms  0.306 ms  0.276 ms
 4  2001:41d0:0:1:3::b868 (2001:41d0:0:1:3::b868)  0.355 ms  0.333 ms 2001:41d0:0:1:3::b866 (2001:41d0:0:1:3::b866)  0.325 ms
 5  * * *
 6  fdff:f000:8::2 (fdff:f000:8::2)  0.798 ms * *
 7  fdff:f003:10::38 (fdff:f003:10::38)  2.322 ms fdff:f003:10::32 (fdff:f003:10::32)  2.851 ms fdff:f003:10::4c (fdff:f003:10::4c)  3.826 ms
 8  2001:41d0:20a:600::23 (2001:41d0:20a:600::23)  0.933 ms 2001:41d0:20a:600::25 (2001:41d0:20a:600::25)  0.612 ms 2001:41d0:20a:600::1f (2001:41d0:20a:600::1f)  1.426 ms
 9  be102.par-gsw-sbb1-nc5.fr.eu (2001:41d0::42f)  5.037 ms be102.par-th2-sbb1-nc5.fr.eu (2001:41d0::439)  4.990 ms be102.par-gsw-sbb1-nc5.fr.eu (2001:41d0::42f)  4.701 ms
10  ae301.par-pa3-pb2-ptx.fr.eu (2001:41d0::26a9)  4.624 ms be301.par-th2-pb1-nc5.fr.eu (2001:41d0::25cb)  4.540 ms  4.810 ms
11  * * *
12  2a01:e00:6216::30 (2a01:e00:6216::30)  5.539 ms * *
13  * * *
14  * * *
15  2a01:e03:6218:: (2a01:e03:6218::)  9.709 ms * *
16  2a01:e03:6:1700:fe00::f005 (2a01:e03:6:1700:fe00::f005)  10.633 ms  10.614 ms 2a01:e03:6218:: (2a01:e03:6218::)  10.086 ms
17  2a01:e03:6:1700:fe00::f005 (2a01:e03:6:1700:fe00::f005)  10.967 ms  10.922 ms 2a01:e0a:95a:e2f0::1 (2a01:e0a:95a:e2f0::1)  11.251 ms
18  * 2a01:e0a:95a:e2f0::1 (2a01:e0a:95a:e2f0::1)  11.865 ms *
19  * * *
Serveur debian 13 rnmkcy.eu /etc/network/interfaces
1
2
3
4
5
6
7
8
9
10
11
12
13
14
15
16
17
18
19
20
21
22
23
24
# This file describes the network interfaces available on your system
# and how to activate them. For more information, see interfaces(5).

source /etc/network/interfaces.d/*

# The loopback network interface
auto lo
iface lo inet loopback

# The primary network interface
allow-hotplug enp3s0
#iface enp3s0 inet dhcp
iface enp3s0 inet static
    address 192.168.0.205
    netmask 255.255.255.0
    gateway 192.168.0.254

iface enp3s0 inet6 static
    address 2a01:e0a:95a:e2f0:aab8:e0ff:fe04:ec45/64
    accept_ra 0

auto enp4s0
iface enp4s0 inet static
    address 192.168.10.100/24
ip a
1
2
3
4
5
6
7
8
9
2: enp3s0: <BROADCAST,MULTICAST,UP,LOWER_UP> mtu 1500 qdisc mq state UP group default qlen 1000
    link/ether a8:b8:e0:04:ec:45 brd ff:ff:ff:ff:ff:ff
    altname enxa8b8e004ec45
    inet 192.168.0.205/24 brd 192.168.0.255 scope global enp3s0
       valid_lft forever preferred_lft forever
    inet6 2a01:e0a:95a:e2f0:aab8:e0ff:fe04:ec45/64 scope global
       valid_lft forever preferred_lft forever
    inet6 fe80::aab8:e0ff:fe04:ec45/64 scope link proto kernel_ll
       valid_lft forever preferred_lft forever
Vérifier les routes IPv6 :
1
ip -6 route
1
2
3
4
5
6
7
8
9
10
11
12
13
14
15
16
2a01:e0a:95a:e2f0::/64 dev enp3s0 proto kernel metric 256 pref medium
fda3:4291:71b9:2f0a::/64 dev nebula1 proto kernel metric 256 pref medium
fda3:4291:71b9:2f0a::/64 dev nebula1 proto kernel src fda3:4291:71b9:2f0a::2 metric 1024 mtu 1300 pref medium
fe80::/64 dev br-902752b9bc5b proto kernel metric 256 pref medium
fe80::/64 dev vetha7b7395 proto kernel metric 256 pref medium
fe80::/64 dev br-4e50852a968c proto kernel metric 256 pref medium
fe80::/64 dev veth25ff10a proto kernel metric 256 pref medium
fe80::/64 dev br-38d58748a938 proto kernel metric 256 pref medium
fe80::/64 dev vethcb76b52 proto kernel metric 256 pref medium
fe80::/64 dev br-0160f4d24923 proto kernel metric 256 pref medium
fe80::/64 dev veth1d81591 proto kernel metric 256 pref medium
fe80::/64 dev veth3be2483 proto kernel metric 256 pref medium
fe80::/64 dev veth811872c proto kernel metric 256 pref medium
fe80::/64 dev enp4s0 proto kernel metric 256 pref medium
fe80::/64 dev enp3s0 proto kernel metric 256 pref medium
fe80::/64 dev veth01f38f4 proto kernel metric 256 pref medium
Tu dois voir une route du genre :
default via <gateway_ipv6> dev enp3s0ou au minimum une sortie vers ton prefix “internet”.
Vérifier l’existence d’une route “default” :
1
ip -6 route show default
1
# Rien - aucune route par défaut IPv6
sur le serveur aucune route par défaut IPv6 (
default), que des routes pour les préfixes locaux (2a01:e0a:.../64,fda3:.../64,fe80::/64).
Résultat : la machine sait répondre pour le local, mais pour joindre Internet en IPv6 elle ne sait pas où envoyer le trafic ⇒ ping/traceroute IPv6 cassés.
Il faut réintroduire une passerelle IPv6 / route default.
Remède côté Debian (RA)
Dans le /etc/network/interfaces, i y a accept_ra 0. Mettre à 1 (ou supprimer la ligne) pour permettre l’apprentissage de la route default via RA
1
2
3
iface enp3s0 inet6 static
    address 2a01:e0a:95a:e2f0:aab8:e0ff:fe04:ec45/64
    accept_ra 1
Puis :
1
systemctl restart networking
Ensuite tester :
1
2
3
ip -6 route show default
ping -6 -c3 rnmkcy.eu
traceroute -6 rnmkcy.eu
Sortie
1
2
3
4
5
6
7
8
9
10
11
12
13
14
15
16
ip -6 route show default
default via fe80::8e97:eaff:fe39:66d6 dev enp3s0 proto ra metric 1024 expires 1764sec hoplimit 64 pref medium

ping -6 -c3 rnmkcy.eu
PING rnmkcy.eu (2a01:e0a:95a:e2f0:aab8:e0ff:fe04:ec45) 56 data bytes
64 bytes from 86400 (2a01:e0a:95a:e2f0:aab8:e0ff:fe04:ec45): icmp_seq=1 ttl=64 time=0.081 ms
64 bytes from 86400 (2a01:e0a:95a:e2f0:aab8:e0ff:fe04:ec45): icmp_seq=2 ttl=64 time=0.140 ms
64 bytes from 86400 (2a01:e0a:95a:e2f0:aab8:e0ff:fe04:ec45): icmp_seq=3 ttl=64 time=0.128 ms

--- rnmkcy.eu ping statistics ---
3 packets transmitted, 3 received, 0% packet loss, time 2030ms
rtt min/avg/max/mdev = 0.081/0.116/0.140/0.025 ms

traceroute -6 rnmkcy.eu
traceroute to rnmkcy.eu (2a01:e0a:95a:e2f0:aab8:e0ff:fe04:ec45), 30 hops max, 80 byte packets
 1  86400 (2a01:e0a:95a:e2f0:aab8:e0ff:fe04:ec45)  1.088 ms  0.957 ms  0.891 ms
Après correction de la route default IPv6,
ping -6répond parfaitement. Le problème “IPv6 cassé” est donc réglé côté serveur.
Ton traceroute -6 n’atteint pas tous les hops (* * autour de certains routeurs), mais ce n’est pas bloquant : les routeurs peuvent ne pas répondre à TTL/ICMP time exceeded (filtrage volontaire, rate-limit, politiques ICMP), alors que la connectivité de bout en bout (ping) marche.
Si ton but est “tout fonctionne en IPv6” :
- Les tests de connectivité à faire ensuite sont plutôt TCP/HTTPS ou DNS, pas forcément traceroute complet.
curl -6 https://rnmkcy.eu -Idig AAAA rnmkcy.eunc -6 -vz rnmkcy.eu 443
Depuis un VPS
1
curl -6 https://rnmkcy.eu -I
Réponse
1
2
3
4
5
6
7
8
HTTP/2 200
server: nginx
date: Fri, 24 Jul 2026 15:42:49 GMT
content-type: text/html
content-length: 22584
last-modified: Fri, 24 Jul 2026 11:32:21 GMT
etag: "6a634d45-5838"
accept-ranges: bytes
1
dig AAAA rnmkcy.eu
Réponse
1
2
3
4
5
6
7
8
9
10
11
12
13
14
15
16
17
18
; <<>> DiG 9.20.26-1~deb13u1-Debian <<>> AAAA rnmkcy.eu
;; global options: +cmd
;; Got answer:
;; ->>HEADER<<- opcode: QUERY, status: NOERROR, id: 19948
;; flags: qr rd ra; QUERY: 1, ANSWER: 1, AUTHORITY: 0, ADDITIONAL: 1

;; OPT PSEUDOSECTION:
; EDNS: version: 0, flags:; udp: 65494
;; QUESTION SECTION:
;rnmkcy.eu.			IN	AAAA

;; ANSWER SECTION:
rnmkcy.eu.		1390	IN	AAAA	2a01:e0a:95a:e2f0:aab8:e0ff:fe04:ec45

;; Query time: 0 msec
;; SERVER: 127.0.0.53#53(127.0.0.53) (UDP)
;; WHEN: Fri Jul 24 17:43:56 CEST 2026
;; MSG SIZE  rcvd: 66
1
nc -6 -vz rnmkcy.eu 443
Réponse
1
Connection to rnmkcy.eu (2a01:e0a:95a:e2f0:aab8:e0ff:fe04:ec45) 443 port [tcp/https] succeeded!
DNS Technitium
🌐 Technitium DNS Server autoritatif et récursif
Parefeu UFW

UFW, ou pare - feu simple , est une interface pour gérer les règles de pare-feu dans Arch Linux, Debian ou Ubuntu. UFW est utilisé via la ligne de commande (bien qu’il dispose d’interfaces graphiques disponibles), et vise à rendre la configuration du pare-feu facile.
Installation Debian / Ubuntu
1
sudo apt install ufw
Par défaut, les jeux de règles d’UFW sont vides, de sorte qu’il n’applique aucune règle de pare-feu, même lorsque le démon est en cours d’exécution.
En mode su
Les règles
1
2
3
4
5
6
7
8
9
# Action  type                   provenance
ufw allow http       # port 80
ufw allow https      # port 443
ufw allow dns        # port 53
ufw allow 55205/tcp  # port ssh
ufw allow from 192.168.0.0/24    # tout traffic
ufw allow from 192.168.10.0/24   # tout traffic
ufw allow from 10.139.110.0/24 to any port nfs
ufw allow from fda3:4291:71b9::/48 to any port nfs
Activer le parefeu
1
ufw enable
1
2
Command may disrupt existing ssh connections. Proceed with operation (y|n)? y
Firewall is active and enabled on system startup
Status
1
ufw status
1
2
3
4
5
6
7
8
9
10
11
12
13
14
15
16
Status: active

To                         Action      From
--                         ------      ----
80/tcp                     ALLOW       Anywhere
443                        ALLOW       Anywhere
DNS                        ALLOW       Anywhere
55205/tcp                  ALLOW       Anywhere
Anywhere                   ALLOW       192.168.0.0/24
Anywhere                   ALLOW       192.168.10.0/24
2049                       ALLOW       10.139.110.0/24
80/tcp (v6)                ALLOW       Anywhere (v6)
443 (v6)                   ALLOW       Anywhere (v6)
DNS (v6)                   ALLOW       Anywhere (v6)
55205/tcp (v6)             ALLOW       Anywhere (v6)
2049                       ALLOW       fda3:4291:71b9::/48
désactiver la journalisation
1
sudo ufw logging off
Recharger le service ufw
1
sudo ufw reload
Partage NFS
Dossier sharenfs
Création dossier
1
2
sudo mkdir -p /sharenfs
sudo chown $USER:$USER -R /sharenfs
Point de montage fstab
1
2
#  /dev/mapper/nvmea--vg-sharenfs
UUID=eb2cfabe-8e1d-463d-a62d-9da921a747f3 /sharenfs ext4    defaults    0	2
NFS Serveur
Installer outils nfs
1
2
sudo apt update
sudo apt install nfs-kernel-server -y
Ouvrez le fichier /etc/exports à l’aide de la commande d’éditeur nano suivante.
1
sudo nano /etc/exports
Ajoutez les lignes suivantes au fichier.
1
2
3
4
5
6
7
#
# Pour valider: sudo exportfs -ra
#
/sharenfs 192.168.0.0/24(rw,no_root_squash,no_subtree_check)
/sharenfs 192.168.10.0/24(rw,no_root_squash,no_subtree_check)
/sharenfs 10.139.110.0/24(rw,no_root_squash,no_subtree_check)
/sharenfs fda3:4291:71b9::/48(rw,no_root_squash,no_subtree_check)
Enregistrez et fermez le fichier lorsque vous avez terminé.
Vous trouverez ci-dessous quelques options NFS utilisées pour ce cas :
- rw : autorise l’accès en lecture et en écriture pour le serveur et le client NFS au volume/répertoire.
- no_subtree_check : désactive la vérification des sous-arbres, ce qui a de légères implications en matière de sécurité, mais peut améliorer la fiabilité dans certaines circonstances.
- no_root_squash : désactive le squashing de la racine. Cette option est principalement utile pour les clients sans disque.
- fsid=0 : pour NFSv4, si utilisé, ce paramètre est utilisé pour informer le serveur NFS que cette exportation est la racine de tous les systèmes de fichiers exportés.
Ensuite, appliquer les modifications
1
sudo exportfs -ra
Enfin, exécutez la commande suivante pour vérifier le répertoire et le système de fichiers exportés sur le serveur NFS à l’aide de la commande suivante.
1
sudo showmount -e
Si tout se passe bien, vous devriez voir que le répertoire //sharenfs est exporté sur le serveur NFS.
1
2
Export list for alder:
/sharenfs fda3:4291:71b9::/48,192.168.10.0/24,192.168.0.0/24
Afficher la version NFS server: nfsstat -s
1
2
3
4
5
6
7
8
9
10
11
12
Server rpc stats:
calls      badcalls   badfmt     badauth    badclnt
9951959    18         18         0          0

Server nfs v4:
null             compound
19        0%     9952025  99%

Server nfs v4 operations:
op0-unused       op1-unused       op2-future       access           close
0         0%     0         0%     0         0%     1137860   3%     952305    2%
[...]
NFS client
Installez le paquetage du client NFS
1
2
sudo apt install nfs-common # debian
sudo pacman -S nfs-utils    # archlinux
Créer dossier cible
1
sudo mkdir -p /mnt/cwwk
Montage manuel
1
sudo mount.nfs4 192.168.0.205:/sharenfs /mnt/cwwk
Démontage
1
sudo umount /mnt/cwwk
Montage /etc/fstab
1
2
# Serveur debian 13 cwwk 192.168.0.205
192.168.0.205:/sharenfs	/mnt/cwwk nfs4 nofail,x-systemd.automount,x-systemd.requires=network-online.target,x-systemd.device-timeout=10s,rsize=8192,wsize=8192 0 0
Rechargement et montage
1
2
sudo systemctl daemon-reload
sudo mount -a
ACL
ACL (Access Control Lists) est un mécanisme permissions de fichiers disponible dans Linux. Vous pouvez gérer des autorisations de fichiers étendues grâce aux commandes getfacl et setfacl.
Outils
1
2
sudo apt update
sudo apt install acl  -y
On utilise les acl pour donner les droits en lecture/écriture sur les partages NFS dans les containers LXC non privilégiés
Le piège avec les LXC non privilégiés : l’uid 1000 à l’intérieur du conteneur correspond à l’uid 101000 sur l’hôte Proxmox (le décalage subuid par défaut est de 100000). Lorsque NFS voit la demande d’écriture, elle provient de l’uid 101000, pas de 1000, donc votre chown sur l’hôte pointe vers le mauvais propriétaire. Soitchown -R 101000:101000 /mnt/mediasur l’hôte, soit configurez votre export NFS dans OMV pour accorder les droits de lecture/écriture à l’uid 101000.
Avec NFSv4 (Debian 13) et un container LXC non-privilégié, la solution ACL côté serveur reste la plus simple — en utilisant l’UID hôte (1000 + 100000 = 101000).
En mode su
Editer /etc/fstab et ajoutez ,acl sur la ligne du device
1
2
#  /dev/mapper/nvmea--vg-sharenfs
UUID=eb2cfabe-8e1d-463d-a62d-9da921a747f3 /sharenfs ext4    defaults,acl     0	2
Remontage
1
2
systemctl daemon-reload
mount -a
Appliquer ACLs récursives et par défaut pour l’UID hôte 101000 :
1
2
setfacl -R -m u:101000:rwx /sharenfs
setfacl -R -m d:u:101000:rwx /sharenfs
Vérifier ACLs :
1
getfacl /sharenfs
Résultat
1
2
3
4
5
6
7
8
9
10
11
12
13
14
getfacl : suppression du premier « / » des noms de chemins absolus
# file: sharenfs
# owner: yick
# group: yick
user::rwx
user:101000:rwx
group::r-x
mask::rwx
other::r-x
default:user::rwx
default:user:101000:rwx
default:group::r-x
default:mask::rwx
default:other::r-x
Exporter / recharger exportfs (pas nécessaire)
1
exportfs -ra
Partage Samba Freebox
Partage disque USB 2To monté sur FreeboX
Accés partage samba depuis linux
Installation paquet cifs-utils
1
2
sudo apt install cifs-utils  # Debian
sudo pacman -S cifs-utils    # Archlinux
Création répertoire de montage et lien
1
2
sudo mkdir /mnt/FreeUSB2To
sudo ln -s /mnt/FreeUSB2To $HOME/FreeUSB2To
Création fichier caché pour login et mot de passe
1
sudo nano /root/.smbcredentials
Dans le fichier, ajoutez les lignes suivantes (remplacez les XXXX par votre login et mot de passe)
1
2
username=XXXXXX
password=XXXXXX
Donnez les droits adéquats au fichier
1
2
sudo chown -R root:root /root/.smbcredentials
sudo chmod -R 600 /root/.smbcredentials
Montage linux du disque USB Freebox
Résumé
Partage : //192.168.0.254/FreeUSB2To
Point de montage local : sudo mkdir -p /mnt/FreeUSB2To
Outil cifs : sudo apt install cifs-utils
Utlisateur mot de passe: /root/.smbcredentials
Lien: ln -s /mnt/FreeUSB2To/ $HOME/FreeUSB2To
Trois options de montage, via systemd.mount, systemd.automount ou fstab
A-Montage systemd mount
Le fichier mount: /etc/systemd/system/mnt-FreeUSB2To.mount
1
2
3
4
5
6
7
8
9
10
11
12
13
[Unit]
  Description=cifs mount script
  After=network-online.target
  Wants=network-online.target

[Mount]
  What=//192.168.0.254/FreeUSB2To
  Where=/mnt/FreeUSB2To
  Options=credentials=/root/.smbcredentials,rw,uid=1000,gid=1000,vers=3.0
  Type=cifs

[Install]
  WantedBy=multi-user.target
Lancement et activation mount
1
sudo systemctl enable mnt-FreeUSB2To.mount --now
Vérifier : ls /mnt/FreeUSB2To/
B-Montage systemd automount (UTILISE)
Ajout “timeout” d’attente de montage côté systemd
Le fichier mount: /etc/systemd/system/mnt-FreeUSB2To.mount
1
2
3
4
5
6
7
8
9
10
11
12
13
14
[Unit]
  Description=cifs mount freebox
  After=network-online.target
  Wants=network-online.target

[Mount]
  TimeoutSec=60
  What=//192.168.0.254/FreeUSB2To
  Where=/mnt/FreeUSB2To
  Options=credentials=/root/.smbcredentials,vers=3.0,rw,uid=1000,gid=1000,soft,noserverino
  Type=cifs

[Install]
  WantedBy=multi-user.target
- soft : la commande “abandonne” après le timeout (évite de rester bloqué longtemps)
- noserverino , pour éviter les avertissements dans les logs
1
2
3
4
  juil. 10 10:14:41 alder kernel: CIFS: VFS: Autodisabling the use of server inode numbers on \\192.168.0.254\FreeUSB2To
  juil. 10 10:14:41 alder kernel: CIFS: VFS: The server doesn't seem to support them properly or the files might be on different servers (DFS)
  juil. 10 10:14:41 alder kernel: CIFS: VFS: Hardlinks will not be recognized on this mount. Consider mounting with the "noserverino" option to silence this message.
  juil. 10 10:15:01 alder CRON[1279994]: pam_unix(cron:session): session opened for user www-data(uid=33) by www-data(uid=0)
Le fichier automount: /etc/systemd/system/mnt-FreeUSB2To.automount
1
2
3
4
5
6
7
8
9
10
11
[Unit]
  Description=cifs mount script
  Requires=network-online.target
  After=network-online.service

[Automount]
  Where=/mnt/FreeUSB2To
  TimeoutIdleSec=0

[Install]
  WantedBy=multi-user.target
Lancement et activation automount
1
sudo systemctl enable mnt-FreeUSB2To.automount --now
Si vous utiliez mnt-FreeUSB2To.automount, mnt-FreeUSB2To.mount doit être désactivé
Vérifier : ls /mnt/FreeUSB2To/
Nebula
Installation locale
1
2
3
4
5
6
7
8
9
10
11
12
13
14
15
16
17
18
19
sudo cp /sharenfs/nebula-v2/nebula /usr/local/bin/
sudo chmod +x /usr/local/bin/nebula
#
# Répertoire, configuration et certificats nebula
#
sudo mkdir -p /etc/nebula
sudo cp /sharenfs/nebula-v2/config-server-nfs.yaml /etc/nebula/config.yaml
sudo cp /sharenfs/nebula-v2/ca.crt /etc/nebula/ca.crt
sudo cp /sharenfs/nebula-v2/cwwk-nebula.key /etc/nebula/host.key
sudo cp /sharenfs/nebula-v2/cwwk-nebula.crt /etc/nebula/host.crt
sudo cp /sharenfs/nebula-v2/nebula.service /etc/systemd/system/nebula.service
# Recharge de la configuration systemd
sudo systemctl daemon-reload
# Démarrage et activation du service nebula
echo "Démarrage et activation du service nebula"
sudo systemctl enable nebula --now
echo "Status service nebula"
sudo systemctl status nebula
Vérification: ip a
1
2
3
4
5
6
7
8
9
10
11
12
13
14
15
16
17
18
19
20
21
22
23
24
1: lo: <LOOPBACK,UP,LOWER_UP> mtu 65536 qdisc noqueue state UNKNOWN group default qlen 1000
    link/loopback 00:00:00:00:00:00 brd 00:00:00:00:00:00
    inet 127.0.0.1/8 scope host lo
       valid_lft forever preferred_lft forever
    inet6 ::1/128 scope host noprefixroute
       valid_lft forever preferred_lft forever
2: enp3s0: <BROADCAST,MULTICAST,UP,LOWER_UP> mtu 1500 qdisc mq state UP group default qlen 1000
    link/ether a8:b8:e0:04:ec:45 brd ff:ff:ff:ff:ff:ff
    altname enxa8b8e004ec45
    inet 192.168.0.205/24 brd 192.168.0.255 scope global dynamic enp3s0
       valid_lft 34666sec preferred_lft 29266sec
    inet6 2a01:e0a:95a:e2f0:bef3:8f74:c43d:f5d7/64 scope global dynamic mngtmpaddr noprefixroute
       valid_lft 86189sec preferred_lft 86189sec
    inet6 fe80::33f8:68b6:5b1e:5be2/64 scope link
       valid_lft forever preferred_lft forever
3: enp4s0: <BROADCAST,MULTICAST> mtu 1500 qdisc noop state DOWN group default qlen 1000
    link/ether a8:b8:e0:04:ec:46 brd ff:ff:ff:ff:ff:ff
    altname enxa8b8e004ec46
4: nebula1: <POINTOPOINT,MULTICAST,NOARP,UP,LOWER_UP> mtu 1300 qdisc fq_codel state UNKNOWN group default qlen 500
    link/none
    inet 10.139.110.2/24 brd 10.139.110.255 scope global nebula1
       valid_lft forever preferred_lft forever
    inet6 fda3:4291:71b9:2f0a::2/64 scope global
       valid_lft forever preferred_lft forever
sbin+Go+Node+Docker
sbin
Dans la session utilisateur :
1
echo "$PATH"
Si /usr/sbin est absent, ajoute‑le dans le shell
1
2
#   Pour Bash, ajout dans ~/.bashrc ou ~/.profile :
export PATH="/usr/local/sbin:/usr/sbin:/sbin:$PATH"
Puis recharger le fichier (ou rouvre une session) :
1
source ~/.bashrc
Go
1
2
3
4
5
6
7
8
cd ~
# https://go.dev/dl/  # chercher dernère version linux-amd64
wget https://go.dev/dl/go1.26.4.linux-amd64.tar.gz
sudo tar -C /usr/local -xzf go1.26.4.linux-amd64.tar.gz
echo "export PATH=$PATH:/usr/local/go/bin"  >> ~/.bashrc
source ~/.bashrc
# Version
go version
Node
1
2
3
4
5
# Télécharger et installer nvm :
curl -o- https://raw.githubusercontent.com/nvm-sh/nvm/v0.40.3/install.sh | bash
# au lieu de redémarrer le shell
\. "$HOME/.nvm/nvm.sh"
exit 0
Versions disponibles
1
nvm ls-remote
On installe la dernière version LTS
1
nvm install --lts
Docker
1
2
3
4
5
6
7
8
9
10
11
12
13
# 1. Supprimer d’anciennes versions (les images/containers sont conservés)
sudo apt remove docker docker-engine docker.io containerd runc
# 2. Installer prérequis
sudo apt install -y ca-certificates curl gnupg lsb-release
# 3. Ajout clé GPG Docker
sudo install -m 0755 -d /etc/apt/keyrings
curl -fsSL https://download.docker.com/linux/debian/gpg | sudo gpg --dearmor -o /etc/apt/keyrings/docker.gpg
# 4. Ajout dépôt
echo "deb [arch=$(dpkg --print-architecture) signed-by=/etc/apt/keyrings/docker.gpg] https://download.docker.com/linux/debian trixie stable" | sudo tee /etc/apt/sources.list.d/docker.list > /dev/null
# 5. Installer Docker
sudo apt update && sudo apt install -y docker-ce docker-ce-cli containerd.io docker-buildx-plugin docker-compose-plugin
# 6. Add user to group
sudo usermod -aG docker $USER && newgrp docker
Docker utilise un DNS différent de celui configuré dans /etc/resolv.conf
Il utilise probablement le DNS Google par défaut (8.8.8.8) et pas celui de /etc/resolv.conf.
Voici comment configurer Docker pour utiliser un DNS externe (en mode su).
1
2
3
4
5
6
mkdir -p /etc/docker
cat > /etc/docker/daemon.json << 'EOF'
{
  "dns": ["9.9.9.9", "1.1.1.1"]
}
EOF
Puis redémarre Docker
1
2
sudo systemctl daemon-reexec
sudo systemctl restart docker
⌚WatchTower - Automatiser les mises à jour conteneur docker est un outil open-source permettant d’automatiser les mises à jour.
Versions Go+Node+Docker
1
go version && echo "Node $(node -v)" && echo "npm version $(npm -v)" && docker -v && docker compose version
1
2
3
4
5
6
# 05/06/2026
go version go1.26.4 linux/amd64
Node v24.16.0
npm version 11.13.0
Docker version 29.5.3, build d1c06ef
Docker Compose version v5.1.4
Nginx + Certificats
Installation nginx (extras ou compilé)
Installation nginx extras
1
sudo apt install nginx-extras
Modifier le fichier /etc/nginx/nginx.conf , suppression /etc/nginx/sites-* et ajustements
1
2
3
4
5
6
7
8
9
10
11
12
13
14
15
16
17
18
19
20
21
22
23
24
25
26
27
28
29
30
31
32
33
34
35
36
37
38
39
40
41
42
43
44
45
46
47
user www-data;
worker_processes auto;
worker_cpu_affinity auto;
pid /run/nginx.pid;
error_log /var/log/nginx/error.log;
include /etc/nginx/modules-enabled/*.conf;

events {
	worker_connections 768;
	# multi_accept on;
}

http {
	##
	# Basic Settings
	##
	sendfile on;
	tcp_nopush on;
	server_tokens off; # Recommended practice is to turn this off

	variables_hash_max_size 2048;
	variables_hash_bucket_size 128;

	include /etc/nginx/mime.types;
	default_type application/octet-stream;

	##
	# SSL Settings
	##
	ssl_protocols TLSv1.2 TLSv1.3; # Dropping SSLv3 (POODLE), TLS 1.0, 1.1
	ssl_prefer_server_ciphers off; # Don't force server cipher order.

	##
	# Logging Settings
	##
	access_log /var/log/nginx/access.log;

	##
	# Gzip Settings
	##
	gzip on;

	##
	# Virtual Host Configs
	##
	include /etc/nginx/conf.d/*.conf;
}
Suppression des dossiers /etc/nginx/sites-*
1
sudo rm -r /etc/nginx/sites-*
Vérification et rechargement nginx
1
2
sudo nginx -t
sudo systemctl reload nginx
La vérification nous revoie les informations suivantes
1
2
3
4
2026/06/06 11:14:47 [info] 107686#107686: Using 116KiB of shared memory for nchan in /etc/nginx/nginx.conf:47
2026/06/06 11:14:47 [info] 107686#107686: Using 131072KiB of shared memory for nchan in /etc/nginx/nginx.conf:47
nginx: the configuration file /etc/nginx/nginx.conf syntax is ok
nginx: configuration file /etc/nginx/nginx.conf test is successful
Configuration nginx OK et indique que le module nchan (module de pub/sub en temps réel pour Nginx) utilise de la mémoire partagée lors du démarrage de Nginx
Ces messages [info] disent simplement que nchan a alloué :
- 116 KiB (première ligne)
- puis 131 072 KiB ≈ 128 MiB (seconde ligne)
de mémoire partagée, selon la configuration sur la ligne 64 de
/etc/nginx/nginx.conf
Je n’ai pas besoin du module nchan** (pas de fonction pub/sub, WebSocket temps réel, chat, etc.), désactiver le module pour éviter les messages et économiser la mémoire
Désactiver nchan (Non utilisé)
1
2
3
4
5
6
# lien:
# /etc/nginx/modules-enabled/50-mod-nchan.conf -> /usr/share/nginx/modules-available/mod-nchan.conf
# Effacer le lien
sudo rm /etc/nginx/modules-enabled/50-mod-nchan.conf
# redémarrer nginx
sudo systemctl restart nginx
Si besoin, le réactiver et redémarrer nginx
1
2
3
4
# Créer le lien
sudo ln -s /usr/share/nginx/modules-available/mod-nchan.conf /etc/nginx/modules-enabled/50-mod-nchan.conf
# redémarrer nginx
sudo systemctl restart nginx
Donner à Nginx l’accès au groupe yick.
1
sudo usermod -aG yick www-data
Après l’ajout de www-data au groupe yick, il faut redémarrer Nginx pour qu’il prenne en compte les nouveaux groupes :
1
sudo systemctl restart nginx
Certificats
💭Nextcloud HUB
Sauvegardes
Installer borgbackup
BorgBackup Installation
1
sudo apt install borgbackup
Ajout clé publique à la boite de stockage
Depuis un poste ayant accès à la boîte de stockage, on récupère le fichier authorized_keys de la boîte de stockage bx11-yann dans un fichier nommé storagebox_authorized_keys
1
echo -e "get .ssh/authorized_keys storagebox_authorized_keys" | sftp -P 23 -i ~/.ssh/bx11-yann-ed25519 u326239@u326239.your-storagebox.de
Puis on va ajouter la nouvelle clé publique
1
cat >> storagebox_authorized_keys
Copier/coller le contenu du fichier du fichier de clef publique (fichier cat /root/.ssh/id_borg_ed25519.pub de la machine à sauvegarder dans ce terminal, et presser [Ctrl]+[D] pour valider.
On renvoie le fichier modifié storagebox_authorized_keys dans le fichier authorized_keys de la boîte de stockage bx11-yann
1
echo -e "put storagebox_authorized_keys .ssh/authorized_keys" | sftp -P 23 -i ~/.ssh/bx11-yann-ed25519 u326239@u326239.your-storagebox.de
Tester la connexion à la boîte de stockage (toujours en mode su)
1
sftp -P 23 -i /root/.ssh/id_borg_ed25519 u326239@u326239.your-storagebox.de
Réponse
1
2
3
4
5
6
7
8
9
10
11
The authenticity of host '[u326239.your-storagebox.de]:23 ([2a01:4f8:b23:2000::35]:23)' can't be established.

ECDSA key fingerprint is SHA256:oDHZqKXnoMtgvPBjjC57pcuFez28roaEuFcfwyg8O5c.

Are you sure you want to continue connecting (yes/no/[fingerprint])? yes

Warning: Permanently added '[u326239.your-storagebox.de]:23,[2a01:4f8:b23:2000::35]:23' (ECDSA) to the list of known hosts.

Connected to u326239.your-storagebox.de.

sftp>
Saisir quit pour sortir
BorgBackup dépôt cwwk
Création dépôt dans la boîte de stockage (repository)
Dépôt distant à travers SSH
1
ssh://u326239@u326239.your-storagebox.de:23/./backup/borg/cwwk
Copier la clé privée, en mode root
1
2
3
4
mkdir -p /root/.ssh
cp /sharenfs/pc1/.borg/cwwk.borgssh /root/.ssh/id_borg_ed25519
chown root:root /root/.ssh/id_borg_ed25519
chmod 400  /root/.ssh/id_borg_ed25519
Phrase forte: /sharenfs/pc1/.borg/cwwk.passphrase
Initialisation dépôt distant cwwk en mode su
1
2
3
4
export BORG_PASSPHRASE="$(cat /sharenfs/pc1/.borg/cwwk.passphrase)"
export BORG_RSH='ssh -i /root/.ssh/id_borg_ed25519'
BORG_REPOSITORY=ssh://u326239@u326239.your-storagebox.de:23/./backup/borg/cwwk
borg init --encryption=repokey $BORG_REPOSITORY
Le fichier d’exclusion /sharenfs/pc1/.borg/cwwk.exclusions
En mode utilisateur
Créer un script de sauvegarde (notez l’usage de borg prune pour supprimer les archives trop anciennes)
1
sudo nano /sharenfs/scripts/borgbackup-cwwk.sh
1
2
3
4
5
6
7
8
9
10
11
12
13
14
15
16
17
18
19
20
21
22
23
24
25
#!/bin/sh
#
# Script de sauvegarde.
#
# Envoie les sauvegardes sur un serveur distant, via le programme Borg.
# Les sauvegardes sont chiffrées
t=$(date +%s)
export BORG_PASSPHRASE=`cat /sharenfs/pc1/.borg/cwwk.passphrase`
export BORG_RSH='ssh -i /root/.ssh/id_borg_ed25519'
BACKUP_DATE=`date +%Y-%m-%d-%Hh%M`
BORG_REPOSITORY=`cat /sharenfs/pc1/.borg/cwwk.repository`
borg create -v --progress --stats --exclude-from /sharenfs/pc1/.borg/cwwk.exclusions ${BORG_REPOSITORY}::${BACKUP_DATE} /
borg prune -v --list --stats --keep-daily=7 --keep-weekly=4 --keep-monthly=6 $BORG_REPOSITORY
d=$(($(date +%s) - $t))
DUREE=$(($d / 3600 ))h$((($d % 3600) / 60))m$(($d % 60))s
# Message
curl --ipv4 \
-H "X-Email: ntfy@cinay.eu" \
-H "Title: 💾 $HOSTNAME : Borgbackup CWWK en $DUREE" \
-H "Authorization: Bearer tk_.............................zr" \
-H prio:low \
-d "CWWK Debian 13
`hostname -I`
 ✔️ Fin de la sauvegarde Borgbackup `date +%d/%m/%Y-%Hh%M`" \
https://noti.rnmkcy.eu/yan_infos
Le rendre exécutable
1
chmod +x /sharenfs/scripts/borgbackup-cwwk.sh
Planification de la sauvegarde en utilisant systemd timer
Le service /etc/systemd/system/borgbackup-cwwk.service
1
2
3
4
5
6
7
8
9
[Unit]
Description=Service borgbackup-cwwk

[Service]
Type=oneshot
ExecStart=/usr/bin/bash /sharenfs/scripts/borgbackup-cwwk.sh

[Install]
WantedBy=multi-user.target
Le timer /etc/systemd/system/borgbackup-cwwk.timer
1
2
3
4
5
6
7
8
9
[Unit]
Description=Timer borgbackup-cwwk

[Timer]
OnCalendar=*-*-* 02:40
Persistent=true

[Install]
WantedBy=timers.target
Exécution tous les jours
Activez/démarrez le timer, puis vérifiez qu’il est chargé et actif
1
2
3
sudo systemctl daemon-reload
sudo systemctl enable borgbackup-cwwk.timer --now
systemctl status borgbackup-cwwk.timer
Vérifiez s’il apparaît dans la liste des minuteries :
1
systemctl list-timers
1
2
NEXT                             LEFT LAST                              PASSED UNIT                         ACTIVATES
Sat 2025-11-01 02:50:00 CET       11h -                                      - borgbackup-cwwk.timer        borgbackup-cwwk.service
Lorsque vous voulez voir si les sauvegardes se sont déroulées correctement, vous pouvez consulter le journal le plus récent
1
systemctl status borgbackup-cwwk
Ou afficher tous les journaux avec :
1
sudo journalctl -u borgbackup-cwwk
BorgBackup dépôt sharenfs
Création dépôt dans la boîte de stockage (repository)
Dépôt distant à travers SSH
1
ssh://u326239@u326239.your-storagebox.de:23/./backup/borg/sharenfs
Copier la clé privée, en mode root
1
2
3
4
mkdir -p /root/.ssh
cp /sharenfs/pc1/.borg/sharenfs.borgssh /root/.ssh/id_borg_ed25519
chown root:root /root/.ssh/id_borg_ed25519
chmod 400  /root/.ssh/id_borg_ed25519
Phrase forte: /sharenfs/pc1/.borg/sharenfs.passphrase
Initialisation dépôt distant sharenfs en mode su
1
2
3
4
export BORG_PASSPHRASE="$(cat /sharenfs/pc1/.borg/sharenfs.passphrase)"
export BORG_RSH='ssh -i /root/.ssh/id_borg_ed25519'
BORG_REPOSITORY=ssh://u326239@u326239.your-storagebox.de:23/./backup/borg/sharenfs
borg init --encryption=repokey $BORG_REPOSITORY
Le fichier d’exclusion /sharenfs/pc1/.borg/sharenfs.exclusions
En mode utilisateur
Créer un script de sauvegarde (notez l’usage de borg prune pour supprimer les archives trop anciennes)
1
sudo nano /sharenfs/scripts/borgbackup-sharenfs.sh
1
2
3
4
5
6
7
8
9
10
11
12
13
14
15
16
17
18
19
20
21
22
23
24
25
#!/bin/sh
#
# Script de sauvegarde.
#
# Envoie les sauvegardes sur un serveur distant, via le programme Borg.
# Les sauvegardes sont chiffrées
t=$(date +%s)
export BORG_PASSPHRASE=`cat /sharenfs/pc1/.borg/sharenfs.passphrase`
export BORG_RSH='ssh -i /root/.ssh/id_borg_ed25519'
BACKUP_DATE=`date +%Y-%m-%d-%Hh%M`
BORG_REPOSITORY=`cat /sharenfs/pc1/.borg/sharenfs.repository`
borg create -v --progress --stats --exclude-from /sharenfs/pc1/.borg/sharenfs.exclusions ${BORG_REPOSITORY}::${BACKUP_DATE} /sharenfs
borg prune -v --list --stats --keep-daily=7 --keep-weekly=4 --keep-monthly=6 $BORG_REPOSITORY
d=$(($(date +%s) - $t))
DUREE=$(($d / 3600 ))h$((($d % 3600) / 60))m$(($d % 60))s
# Message
curl --ipv4 \
-H "X-Email: ntfy@cinay.eu" \
-H "Title: 💾 $HOSTNAME : Borgbackup sharenfs en $DUREE" \
-H "Authorization: Bearer tk_.....................zr" \
-H prio:low \
-d "Sharenfs Debian 13
`hostname -I`
 ✔️ Fin de la sauvegarde Borgbackup `date +%d/%m/%Y-%Hh%M`" \
https://noti.rnmkcy.eu/yan_infos
Le rendre exécutable
1
chmod +x /sharenfs/scripts/borgbackup-sharenfs.sh
Planification de la sauvegarde en utilisant systemd timer
Le service /etc/systemd/system/borgbackup-sharenfs.service
1
2
3
4
5
6
7
8
9
[Unit]
Description=Service borgbackup-sharenfs

[Service]
Type=oneshot
ExecStart=/usr/bin/bash /sharenfs/scripts/borgbackup-sharenfs.sh

[Install]
WantedBy=multi-user.target
Le timer /etc/systemd/system/borgbackup-sharenfs.timer
1
2
3
4
5
6
7
8
9
[Unit]
Description=Timer borgbackup-sharenfs

[Timer]
OnCalendar=*-*-* 02:50
Persistent=true

[Install]
WantedBy=timers.target
Exécution tous les jours
Activez/démarrez le timer, puis vérifiez qu’il est chargé et actif
1
2
3
sudo systemctl daemon-reload
sudo systemctl enable borgbackup-sharenfs.timer --now
systemctl status borgbackup-sharenfs.timer
Vérifiez s’il apparaît dans la liste des minuteries :
1
systemctl list-timers
1
2
NEXT                             LEFT LAST                              PASSED UNIT                         ACTIVATES
Sat 2025-11-01 02:50:00 CET       11h -                                      - borgbackup-sharenfs.timer        borgbackup-sharenfs.service
Lorsque vous voulez voir si les sauvegardes se sont déroulées correctement, vous pouvez consulter le journal le plus récent
1
systemctl status borgbackup-sharenfs
Ou afficher tous les journaux avec :
1
sudo journalctl -u borgbackup-sharenfs
Synchronisation des backup borg
Synchronisation des backup borg entre le serveur de stockage (storage box) et le disque USB partagé monté sur la freebox en utilisant systemd timer.
Le script à exécuter en mode su /sharenfs/scripts/storage-freedisk.sh
1
2
3
4
5
6
7
8
9
10
11
12
13
14
15
16
17
18
19
20
21
22
23
24
25
26
27
28
29
30
31
32
33
34
35
36
37
38
39
40
41
42
43
44
45
46
47
48
49
50
51
52
#!/bin/bash

# Modifié 08/07/2026
. "/sharenfs/scripts/env/ntfy.env"

# Pour le calcul du temps d'exécution
t=$(date +%s)

# Fichier temporaire pour mémoriser toutes les sorties
tmpfile="$(mktemp)"
# Optionnel: affiche même si le script plante
trap 'cat "$tmpfile"; rm -f "$tmpfile"' EXIT

STORAGEBOX="u326239@u326239.your-storagebox.de:backup"
FREEBOX="/mnt/FreeUSB2To/sauvegardes/borgbackup"
# Lecture serveurs
servers=$(cat /sharenfs/pc1/.borg/servers.list)
hote_array=(${servers// / })
echo "Liste: $servers"
for hote in "${hote_array[@]}"
do
  {
    echo "===== RSYNC vers $hote : $(date -Is) ====="
    echo "rsync -avz --delete --rsync-path='rsync' -e 'ssh -p 23 -i /root/.ssh/id_borg_ed25519' $STORAGEBOX/borg/"$hote" $FREEBOX/"
    err=$(rsync -avz --delete --rsync-path='rsync' \
     -e 'ssh -p 23 -i /root/.ssh/id_borg_ed25519' \
      $STORAGEBOX/borg/"$hote" $FREEBOX/ 2>&1 >/dev/null)
   ret=$?

   if [ $ret -ne 0 ]; then
     echo "ERREUR ($ret) :"
     echo "$err"
   else
     echo "OK"
   fi

  } >>"$tmpfile"
done

d=$(($(date +%s) - $t))
DUREE=$(($d / 3600 ))h$((($d % 3600) / 60))m$(($d % 60))s

# Message
curl \
-H "X-Email: $NTFY_EMAIL" \
-H "Title: 🔄Rsync storagebox -> FreeUSB2To en $DUREE" \
-H "Authorization: Bearer $NTFY_TOKEN" \
-H prio:low \
-d "Synchro $0
`cat $tmpfile`
✔️ Fin Rsync u326239@u326239.your-storagebox.de -->  /mnt/FreeUSB2To/sauvegardes/borgbackup/" \
"$NTFY_URL"
Script exécutable
1
chmod +x /sharenfs/scripts/synchro-backup.sh
Le service /etc/systemd/system/storage-freedisk.service
1
2
3
4
5
6
[Unit]
Description=Rsync storagebox vers FreeUSB2To

[Service]
Type=oneshot
ExecStart=/usr/bin/bash /sharenfs/scripts/storage-freedisk.sh
Le timer /etc/systemd/system/storage-freedisk.timer
1
2
3
4
5
6
7
8
9
[Unit]
Description=Rsync storagebox vers FreeUSB2To

[Timer]
OnCalendar=*-*-* 04:25
Persistent=true

[Install]
WantedBy=timers.target
Exécution tous les jours à 4h25 du matin
Activez/démarrez le timer, puis vérifiez qu’il est chargé et actif
1
2
3
sudo systemctl daemon-reload
sudo systemctl enable storage-freedisk.timer --now
systemctl status storage-freedisk.timer
Vérifiez qu’il a été démarré en vérifiant s’il apparaît dans la liste des minuteries :
1
systemctl list-timers
1
2
NEXT                        LEFT          LAST                        PASSED       UNIT                         ACTIVATES
Mon 2024-12-16 04:25:00 CET 20h left      -                           -            storage-freedisk.timer       storage-freedisk.service
Compactage des backup borg
Compacter les backup borg pour récupérer du stockage
Le script à exécuter en mode su /sharenfs/scripts/borg-compact.sh
1
2
3
4
5
6
7
8
9
10
11
12
13
14
15
16
17
18
19
20
21
22
23
24
#!/bin/bash
# compactage des dépôts borg distants
servers=$(cat /sharenfs/pc1/.borg/servers.list)
#servers="pc1 media iceyan.xyz e6230 cwwk asus-xh51 xoyize.xyz"
hote_array=(${servers// / })
for hote in "${hote_array[@]}"
do
export BORG_RSH='ssh -i /sharenfs/pc1/.borg/'$hote'.borgssh'
export BORG_PASSPHRASE=$(cat /sharenfs/pc1/.borg/$hote.passphrase)
export BORG_DEPOT=$(cat /sharenfs/pc1/.borg/$hote.repository)
echo $BORG_DEPOT
borg compact --progress $BORG_DEPOT
done
# Message
curl --ipv4 \
-H "X-Email: ntfy@cinay.eu" \
-H "Title: 💾 Compactage dépôts BorgBackup" \
-H "Authorization: Bearer tk_xxxxxxxxxxxxxxxxxxxxxxxxxx" \
-H prio:low \
-d "CWWK Debian 12
`hostname -I`
🟢 Fin compactage des dépôts distants BorgBackup" \
https://noti.rnmkcy.eu/yan_infos
Script exécutable
1
chmod +x /sharenfs/scripts/borg-compact.sh
Le service /etc/systemd/system/borg-compact.service
1
2
3
4
5
6
[Unit]
Description=Rsync storagebox vers FreeUSB2To

[Service]
Type=oneshot
ExecStart=/usr/bin/bash /sharenfs/scripts/borg-compact.sh
Le timer /etc/systemd/system/borg-compact.timer
1
2
3
4
5
6
7
8
9
[Unit]
Description=Compactage des dépôts borg

[Timer]
OnCalendar=*-*-01 00:00:00
Persistent=true

[Install]
WantedBy=timers.target
Exécution tous les mois
Activez/démarrez le timer, puis vérifiez qu’il est chargé et actif
1
2
3
sudo systemctl daemon-reload
sudo systemctl enable borg-compact.timer --now
systemctl status borg-compact.timer
Vérifiez qu’il a été démarré en vérifiant s’il apparaît dans la liste des minuteries :
1
systemctl list-timers
Authelia
L’authentification unique, souvent désignée par le sigle anglais SSO (de single sign-on) est une méthode permettant à un utilisateur d’accéder à plusieurs applications informatiques (ou sites web sécurisés) en ne procédant qu’à une seule authentification.(Authentification unique)
Authelia pour gérer les autorisations d’accès à des applications en s’appuyant sur l’annuaire lldap
Authelia est maintenant installé comme un paquet .deb et géré via apt.
Procédure installation
Applications web rnmkcy.eu
Fichier Configuration SSL et Certificats
Configuration intermédiaire: /etc/nginx/conf.d/ssl-intermediate.inc
1
2
3
4
5
6
7
8
9
10
11
12
13
14
15
16
17
    ssl_certificate /etc/ssl/private/rnmkcy.eu-fullchain.pem;
    ssl_certificate_key /etc/ssl/private/rnmkcy.eu-key.pem;

    # Use Mozilla's guidelines for SSL/TLS settings
    # https://mozilla.github.io/server-side-tls/ssl-config-generator/
    # intermediate configuration
    ssl_protocols TLSv1.2 TLSv1.3;
    ssl_ecdh_curve X25519:prime256v1:secp384r1;
    ssl_ciphers ECDHE-ECDSA-AES128-GCM-SHA256:ECDHE-RSA-AES128-GCM-SHA256:ECDHE-ECDSA-AES256-GCM-SHA384:ECDHE-RSA-AES256-GCM-SHA384:ECDHE-ECDSA-CHACHA20-POLY1305:ECDHE-RSA-CHACHA20-POLY1305:DHE-RSA-AES128-GCM-SHA256:DHE-RSA-AES256-GCM-SHA384:DHE-RSA-CHACHA20-POLY1305;
    ssl_prefer_server_ciphers off;

    # see also ssl_session_ticket_key alternative to stateful session cache
    ssl_session_timeout 1d;
    ssl_session_cache shared:MozSSL:10m;  # about 40000 sessions

    # curl https://ssl-config.mozilla.org/ffdhe2048.txt > /path/to/dhparam
    ssl_dhparam "/etc/ssl/private/dhparam";
Configuration moderne: /etc/nginx/conf.d/ssl-modern.inc
1
2
3
4
5
6
7
8
9
10
11
12
13
14
    ssl_certificate /etc/ssl/private/rnmkcy.eu-fullchain.pem;
    ssl_certificate_key /etc/ssl/private/rnmkcy.eu-key.pem;

    # Use Mozilla's guidelines for SSL/TLS settings
    # https://mozilla.github.io/server-side-tls/ssl-config-generator/
    # modern configuration
    ssl_protocols TLSv1.3;
    ssl_ecdh_curve X25519:prime256v1:secp384r1;
    ssl_prefer_server_ciphers off;

    # uncomment to enable if ssl_protocols includes TLSv1.2 or earlier;
    # see also ssl_session_ticket_key alternative to stateful session cache
    #ssl_session_timeout 1d;
    #ssl_session_cache shared:MozSSL:10m;  # about 40000 sessions
Dossier racine rnmkcy.eu

1
/etc/nginx/conf.d/rnmkcy.eu.conf
1
2
3
4
5
6
7
8
9
10
11
12
13
14
15
16
17
18
19
20
21
22
23
24
25
26
27
server {
    listen 443 ssl;
    listen [::]:443 ssl;
    http2 on;
    server_name rnmkcy.eu;

    include /etc/nginx/conf.d/ssl-modern.inc;

    root /sharenfs/rnmkcy/racine/ ;
        location / {
            index index.html;
        }
  location ~ \.php(?:$|/) {
    include fastcgi_params;
    fastcgi_param SCRIPT_FILENAME $request_filename;
    fastcgi_split_path_info ^(.+\.php)(/.+)$;
    fastcgi_param HTTPS on;

    fastcgi_param modHeadersAvailable true;         # Avoid sending the security headers twice
    fastcgi_param front_controller_active true;     # Enable pretty urls
    fastcgi_param HTTP_ACCEPT_ENCODING "";          # Disable encoding of nextcloud response to inject ynh scripts
    fastcgi_pass unix:/var/run/php/php8.4-fpm.sock;
    fastcgi_intercept_errors on;
    fastcgi_request_buffering off;
  }

}
Site statique jekyll (static.rnmkcy.eu)
Regroupe static site diceware et cartes
1
/etc/nginx/conf.d/static.rnmkcy.eu.conf
1
2
3
4
5
6
7
8
9
10
11
12
13
14
15
16
17
18
19
20
21
22
23
24
25
server {
    listen 443 ssl http2;
    listen [::]:443 ssl http2;
    server_name static.rnmkcy.eu;

    include /etc/nginx/conf.d/ssl-modern.inc;
    root /sharenfs/multimedia/Divers/static/;

    location / {
      index index.htm index/ index.php;
		  location ~ \.php(?:$|/) {
		    include fastcgi_params;
		    fastcgi_param SCRIPT_FILENAME $request_filename;
		    fastcgi_split_path_info ^(.+\.php)(/.+)$;
		    fastcgi_param HTTPS on;

		    fastcgi_param modHeadersAvailable true;         # Avoid sending the security headers twice
		    fastcgi_param front_controller_active true;     # Enable pretty urls
		    fastcgi_param HTTP_ACCEPT_ENCODING "";          # Disable encoding of nextcloud response to inject ynh scripts
		    fastcgi_pass unix:/var/run/php/php8.4-fpm.sock;
		    fastcgi_intercept_errors on;
		    fastcgi_request_buffering off;
		  }
    }
}
Site statique jekyll (chirpy.rnmkcy.eu)
1
/etc/nginx/conf.d/chirpy.rnmkcy.eu.conf
1
2
3
4
5
6
7
8
9
10
11
12
server {
    listen 443 ssl http2;
    listen [::]:443 ssl http2;
    server_name chirpy.rnmkcy.eu;

    include /etc/nginx/conf.d/ssl-modern.inc;
    root /sharenfs/rnmkcy/chirpy/;

    location / {
      index index.html;
    }
}
Mot passe haute entropie (dice.rnmkcy.eu)
1
/etc/nginx/conf.d/dice.rnmkcy.eu.conf
1
2
3
4
5
6
7
8
9
10
11
12
server {
    listen 443 ssl http2;
    listen [::]:443 ssl http2;
    server_name dice.rnmkcy.eu;

    include /etc/nginx/conf.d/ssl-modern.inc;
    root /sharenfs/multimedia/Divers/diceware/;

    location / {
      index index.htm index/;
    }
}
Leaflet cartographie osm-new (osm.rnmkcy.eu)
1
/etc/nginx/conf.d/osm.rnmkcy.eu.conf
1
2
3
4
5
6
7
8
9
10
11
12
server {
    listen 443 ssl http2;
    listen [::]:443 ssl http2;
    server_name osm.rnmkcy.eu;

    include /etc/nginx/conf.d/ssl-modern.inc;
    root /sharenfs/multimedia/Divers/osm-new/;

    location / {
      index index.htm index/;
    }
}
Recharger : sudo systemctl reload nginx
Calibre web (calibre.rnmkcy.eu)

Les instructions pour une installation de calibre web
1
2
3
4
5
6
7
8
9
10
11
12
13
14
15
16
17
18
sudo apt install python3-venv python3-dev
sudo apt install build-essential libssl-dev libffi-dev
sudo apt install libsasl2-dev libldap2-dev
# Création dossier puis un environnement virtuel pour calibre-web
sudo mkdir -p /sharenfs/rnmkcy/calibreweb
sudo chown $USER:$USER /sharenfs/rnmkcy/calibreweb
python3 -m venv /sharenfs/rnmkcy/calibreweb
# Activer l’environnement
source /sharenfs/rnmkcy/calibreweb/bin/activate
# nouveau prompt -> (calibreweb) yick@cwwk:~$
pip3 install --upgrade pip
pip3 install wheel
pip3 install cmake
pip3 install calibreweb
# ldap
pip3 install python-ldap
pip3 install Flask-SimpleLDAP
Utilisation fichier systemd pour le lancement automatique
1
sudo nano /etc/systemd/system/calibreweb.service
Contenu du fichier
1
2
3
4
5
6
7
8
9
10
11
[Unit]
Description=Service calibreweb
After=network.target

[Service]
Type=simple
User=yick
ExecStart=/sharenfs/rnmkcy/calibreweb/bin/cps

[Install]
WantedBy=multi-user.target
ATTENTION! , User est l’utilisateur connecté ($USER)
Recharger et activer le service calibreweb
1
2
sudo systemctl daemon-reload
sudo systemctl enable --now calibreweb
Vérifie
1
systemctl status calibreweb
proxy nginx
/etc/nginx/conf.d/calibre.rnmkcy.eu.conf
1
2
3
4
5
6
7
8
9
10
11
12
13
14
15
16
17
18
19
20
21
22
23
24
25
26
27
28
29
30
31
32
33
server {
    listen 80;
    listen [::]:80;
    server_name  calibre.rnmkcy.eu;

    # redirect all plain HTTP requests to HTTPS
    return 301 https://calibre.rnmkcy.eu$request_uri;
}

server {
    # ipv4 listening port/protocol
    listen       443 ssl http2;
    # ipv6 listening port/protocol
    listen           [::]:443 ssl http2;
    server_name  calibre.rnmkcy.eu;

    include /etc/nginx/conf.d/ssl-modern.inc;
    #include snippets/authelia-location.conf; # Authelia auth endpoint

#  location / {
#     proxy_pass              http://127.0.0.1:8083;
#     include snippets/authelia-authrequest.conf; # Protect this endpoint
#  }
            location / { # Reduced to "/"
                proxy_pass              http://127.0.0.1:8083;
                proxy_set_header        Host            $http_host;
                proxy_set_header        X-Forwarded-For $proxy_add_x_forwarded_for;
                proxy_set_header        X-Scheme        $scheme;
                #include snippets/authelia-authrequest.conf; # Protect this endpoint
                # Removed proxy_set_header
        }

}
LLDAP…
Gpx studio (gpx.rnmkcy.eu)

Après la construction on copie le dossier build sous /var/www/gpx
1
2
3
sudo cp -r /sharenfs/rnmkcy/gpx.studio/website/build /var/www/gpx.studio
# les droits
sudo chown www-data:www-data -R /var/www/gpx.studio
Le site est accessible dans le dossier /sharenfs/rnmkcy/gpx.studio/website/build/ Configuration nginx /etc/nginx/conf.d/gpx.rnmkcy.eu.conf
1
2
3
4
5
6
7
8
9
10
11
12
server {
    listen 443 ssl http2;
    listen [::]:443 ssl http2;
    server_name gpx.rnmkcy.eu;

    include /etc/nginx/conf.d/ssl-modern.inc;
    root /var/www/gpx.studio/;

    location / {
      index index/;
    }
}
Vérifier et recharger nginx
1
2
sudo nginx -t
sudo systemctl reload nginx
Accès par le lien https://gpx.rnmkcy.eu
Divers et tests (site.rnmkcy.eu)
Points clés
root /sharenfs/rnmkcy/site/;au niveauserver, donc/notes/pointe automatiquement vers/sharenfs/rnmkcy/site/notes/.indexau niveauserver:try_files $uri $uri/ /_h5ai/public/index.php;dans/notes/active les URLs propres pour _h5ai.
Si vous voulez que /notes/index.html soit aussi un chemin absolu dans index, on peut le remettre :
1
index index.html /notes/index.html index.php /_h5ai/public/index.php;
mais alors il y aura deux absolus. Si votre règle est bien “seul le dernier indice doit être absolu”, la version avec index index.html index.php /_h5ai/public/index.php; est la bonne.
Fichie /etc/nginx/conf.d/site.rnmkcy.eu.conf
1
2
3
4
5
6
7
8
9
10
11
12
13
14
15
16
17
18
19
20
21
22
23
24
25
26
27
28
29
30
31
32
33
34
35
36
37
38
39
server {
    listen 443 ssl;
    listen [::]:443 ssl;
    http2 on;
    server_name site.rnmkcy.eu;

    include /etc/nginx/conf.d/ssl-modern.inc;
    include snippets/authelia.conf;

    root /sharenfs/rnmkcy/site/;
    index index.html index.php /_h5ai/public/index.php;

    # Notes : /notes/ → /sharenfs/rnmkcy/site/notes/
    location /notes/ {
        try_files $uri $uri/ /_h5ai/public/index.php;
    }

    # Site statique par défaut
    location / {
        try_files $uri $uri/ =404;
    }

    # PHP uniquement si le fichier existe
    location ~ \.php(?:$|/) {
        try_files $uri =404;
        include fastcgi_params;
        fastcgi_split_path_info ^(.+\.php)(/.+)$;
        fastcgi_param SCRIPT_FILENAME $document_root$fastcgi_script_name;
        fastcgi_param HTTPS on;
        fastcgi_param modHeadersAvailable true;
        fastcgi_param front_controller_active true;
        fastcgi_param HTTP_ACCEPT_ENCODING "";
        fastcgi_pass unix:/run/php/php8.4-fpm.sock;
        fastcgi_intercept_errors on;
        fastcgi_request_buffering off;
    }

    include snippets/auth.conf;
}
Accès par le lien https://site.rnmkcy.eu
Outils IT-tools, Stirling PDF et PrivateBin
Ces 3 outils sont sur la machine virtuelle vm-alpine03
IT-Tools
https://tools.rnmkcy.eu
Fichier de configuration: /etc/nginx/conf.d/tools.rnmkcy.eu.conf
1
2
3
4
5
6
7
8
9
10
11
12
13
14
15
16
17
18
19
20
21
22
server {
    listen 80;
    listen [::]:80;
    server_name  tools.rnmkcy.eu;

    # redirect all plain HTTP requests to HTTPS
    return 301 https://tools.rnmkcy.eu$request_uri;
}

server {
    # ipv4 listening port/protocol
    listen       443 ssl http2;
    # ipv6 listening port/protocol
    listen           [::]:443 ssl http2;
    server_name  tools.rnmkcy.eu;

    include /etc/nginx/conf.d/ssl-modern.inc;

    location / {
	proxy_pass http://192.168.10.213:8080;
    }
}
Stirling PDF
https://pdf.rnmkcy.eu
Fichier de configuration: /etc/nginx/conf.d/pdf.rnmkcy.eu.conf
1
2
3
4
5
6
7
8
9
10
11
12
13
14
15
16
17
18
19
20
21
22
server {
    listen 80;
    listen [::]:80;
    server_name  pdf.rnmkcy.eu;

    # redirect all plain HTTP requests to HTTPS
    return 301 https://pdf.rnmkcy.eu$request_uri;
}

server {
    # ipv4 listening port/protocol
    listen       443 ssl http2;
    # ipv6 listening port/protocol
    listen           [::]:443 ssl http2;
    server_name  pdf.rnmkcy.eu;

    include /etc/nginx/conf.d/ssl-modern.inc;

    location / {
	proxy_pass http://192.168.10.213:8282;
    }
}
PrivateBin
https://privatebin.rnmkcy.eu
Fichier de configuration: /etc/nginx/conf.d/privatebin.rnmkcy.eu.conf
1
2
3
4
5
6
7
8
9
10
11
12
13
14
15
16
17
18
19
20
21
server {
    # ipv4 listening port/protocol
    listen       443 ssl http2;
    # ipv6 listening port/protocol
    listen           [::]:443 ssl http2;
    server_name  privatebin.rnmkcy.eu;

    include /etc/nginx/conf.d/ssl-modern.inc;

    gzip on;

    location / {
        proxy_set_header   X-Real-IP $remote_addr;
        proxy_set_header   X-Forwarded-For $proxy_add_x_forwarded_for;
        proxy_set_header   Host $host;
        proxy_pass         http://192.168.10.213:8081;
        proxy_http_version 1.1;
        proxy_set_header   Upgrade $http_upgrade;
        proxy_set_header   Connection "upgrade";
    }
}
Applications docker
Liste basique des conteneurs
Pour afficher les conteneurs en cours d’exécution uniquement :
1
docker ps
Liste au 22 juillet 2026
1
2
3
4
5
6
7
8
9
CONTAINER ID   IMAGE                                                            COMMAND                  CREATED             STATUS                  PORTS                                                             NAMES
66148301dd81   technitium/dns-server:latest                                     "/usr/bin/dotnet /op…"   About an hour ago   Up About an hour                                                                          technitium
2ab4d6897ab2   portainer/portainer-ce:latest                                    "/portainer -H unix:…"   8 days ago          Up 29 hours             8000/tcp, 9000/tcp, 0.0.0.0:9443->9443/tcp, [::]:9443->9443/tcp   portainer
50f0ea3e8906   ghcr.io/immich-app/immich-server:v2                              "tini -- /bin/bash -…"   2 weeks ago         Up 29 hours (healthy)   0.0.0.0:2283->2283/tcp, [::]:2283->2283/tcp                       immich_server
f4864f86df4a   ghcr.io/immich-app/postgres:14-vectorchord0.4.3-pgvectors0.2.0   "/usr/local/bin/immi…"   2 weeks ago         Up 29 hours (healthy)   5432/tcp                                                          immich_postgres
2c8c77aae152   ghcr.io/immich-app/immich-machine-learning:v2                    "tini -- python -m i…"   2 weeks ago         Up 29 hours (healthy)                                                                     immich_machine_learning
c90ceb3c6be9   valkey/valkey:9                                                  "docker-entrypoint.s…"   2 weeks ago         Up 29 hours (healthy)   6379/tcp                                                          immich_redis
4a6b7f6e1253   israelhikingmap/graphhopper                                      "/bin/bash -c 'java …"   2 weeks ago         Up 29 hours (healthy)   0.0.0.0:8989->8989/tcp, [::]:8989->8989/tcp, 8990/tcp             graphhopper
83a7719337c6   nickfedor/watchtower:latest                                      "/watchtower"            2 weeks ago         Up 29 hours (healthy)   8080/tcp                                                          watchtower
Pour afficher tous les conteneurs, y compris arrêtés :
1
2
3
docker ps -a
# ou
docker container ls -a
L’option -a signifie all et inclut les conteneurs stoppés.
Les principales options de docker ps pour enrichir l’inventaire :
- -a, –all : tous les conteneurs (actifs et arrêtés).
- -s, –size : ajoute la taille du conteneur (système de fichiers + volumes).
- -n N, –last N : affiche les N derniers conteneurs créés.
- -l, –latest : affiche uniquement le dernier conteneur créé.
- -q, –quiet : n’affiche que les IDs (utile pour des scripts).
- -f, –filter : filtre la sortie (par statut, nom, etc.).
- –format : permet un format de sortie personnalisé.
- –no-trunc : évite la troncature des champs (commande complète, ID complet).
Nebula + NFS
Nebula serveur
IP Privée: 10.239.100.4
NFS partage privé
Ajoutez les lignes suivantes au fichier fichier /etc/exports
1
2
3
# partage via nebula
/sharenfs 10.239.100.0/24(rw,no_root_squash,no_subtree_check)
/sharenfs/media_statique_dev 10.239.100.0/24(rw,no_root_squash,no_subtree_check)
redémarrer le service nfs-server
1
2
sudo systemctl restart nfs-server
sudo systemctl status nfs-server
exécutez la commande suivante pour vérifier le répertoire et le système de fichiers exportés sur le serveur NFS
1
sudo showmount -e
Dossiers partagés
1
2
Export list for alder:
/sharenfs fda3:4291:71b9::/48,10.139.110.0/24,192.168.10.0/24,192.168.0.0/24
Maintenance
🖥 How to Build NGINX from Source on Debian 13
Connexion BOX hetzner
Crér un jeu de clés
1
ssh-keygen -t ed25519 -o -a 100 -f ~/.ssh/cwwk_bx11_plakar
Ajout clé publique: cat ~/.ssh/cwwk_bx11_plakar.pub au fichier /home/.ssh/authorized_keys de la boite BX1
1
ssh-ed25519 AAAAC3NzaC1lZDI1NTE5AAAAIBqtUtZFA8uOHZve309r1pjGtKnkBB5hQfUNH9rTm88P yick@cwwk
Tester la connexion pour valider la clé
1
sftp -P 23 -i ~/.ssh/cwwk_bx11_plakar u326239@u326239.your-storagebox.de
Audit - Lynis
Auditez la sécurité de vos serveurs avec Lynis
Installation en mode su
1
2
3
4
5
6
7
sudo -i
cd /tmp
export VERSION=3.1.6
wget https://cisofy.com/files/lynis-${VERSION}.tar.gz
tar -xzf lynis-${VERSION}.tar.gz -C /usr/local
chmod +x /usr/local/lynis/lynis
ln -s /usr/local/lynis/lynis /usr/local/bin
options principales de Lynis
1
2
3
4
5
6
7
8
9
10
11
12
13
14
15
16
17
# Audit rapide (moins verbeux, idéal pour CI/CD)
lynis audit system --quick

# Spécifier un auditeur pour les rapports
lynis audit system --auditor "Mon Entreprise"

# Exécuter uniquement certains tests
lynis audit system --tests "SSH-7408,AUTH-9229"

# Mode pentest (plus agressif, détecte plus de failles)
lynis audit system --pentest

# Sortie sans couleurs (pour les logs)
lynis audit system --no-colors

# Mode silencieux (affiche uniquement les warnings)
lynis audit system --quiet
Agrandir LV sharenfs
Pour agrandir un LV, on va utiliser la commande lvextend
1
2
# Utiliser la totalité restante
lvextend -l +100%FREE /dev/mapper/nvmea--vg-sharenfs
Après avoir agrandi le LV, il faut agrandir le FS ,pour ext4, on utilise la commande resize2fs.
Si on ne met pas d’option, la taille maximale est prise (ce qu’on souhaite dans le LV)
Il est préférable de démonter si possible le système de fichiers, mais l’agrandissement à chaud est possible.
1
2
# Pour ext4, on utilise la commande resize2fs
resize2fs /dev/mapper/nvmea--vg-sharenfs
msmtp ou postfix (OPTION)
Choisir msmtp ou postfix, les 2 ne peuvent pas cohabités
- Debian - Relayer les e-mails vers un compte (msmtp, MailX, Sendmail)
- Postfix minimal sur un serveur local Debian 13
Vérification liens domaine rnmkcy.eu
~/scripts/check_urls_ntfy.sh
Vérification des liens du domaine rnmkcy.eu et envoi notification (ntfy)
1
./check_urls_ntfy.sh -f urls.txt --cacert /etc/ssl/private/rnmkcy.eu-fullchain.pem --ntfy-topic yan_infos --ntfy-token tk_9hxxxxxxxxxxxxxxxxxxxxxxxxxxxxx
Résultat du test
1
2
Summary: total=23 ok=22 fail=1
Output: report.csv
URL en erreur
1
grep 'FAIL' report.csv
1
https://speedtest.rnmkcy.eu","403","FAIL","0.049959",""
Nginx - Gérer les sous domaines inexistants
Si les sous-domaines de rnmkcy.eu n’existent pas, une page d’erreur est affiché
j’ai un domaine nommé rnmkcy.eu avec un joker pour les sous domaines subdomain1.rnmkcy.eu, subdomain2.rnmkcy.eu, etc…
Les sous domaines sont gérés en ssl avec certificat sous nginx, fichier configuration du type
1
2
3
4
5
6
7
8
9
10
11
12
13
14
server {
    listen 443 ssl;
    listen [::]:443 ssl;
    http2 on;
    server_name subdomain1.rnmkcy.eu;
....


server {
    listen 443 ssl;
    listen [::]:443 ssl;
    http2 on;
    server_name subdomain2.rnmkcy.eu;
....
Comment modifier le fichier de configuration nginx pour afficher une erreur si le sous-domaine n’est pas trouvé
Pour renvoyer une erreur (par ex. 404 ou 403) quand le sous-domaine demandé n’existe pas dans vos blocs server spécifiques, vous pouvez ajouter un
server_name catch-allqui prend en charge tout sous-domaine non défini et renvoie l’erreur voulue.
Voici une configuration minimaliste et sûre à ajouter (ou adapter) dans votre fichier nginx :
1) Bloc catch-all pour HTTPS (443) — renvoyer 404
1
2
3
4
5
6
7
8
server {
listen 443 ssl default_server;
listen [::]:443 ssl default_server;
server_name _;
return 404;
ssl_certificate /chemin/vers/cert.pem;
ssl_certificate_key /chemin/vers/key.pem;
}
2) Variante qui renvoie 403 (si vous préférez)
1
2
3
4
5
6
7
8
server {
listen 443 ssl default_server;
listen [::]:443 ssl default_server;
server_name _;
return 403;
ssl_certificate /chemin/vers/cert.pem;
ssl_certificate_key /chemin/vers/key.pem;
}
3) Si vous utilisez HTTP (port 80) et voulez rediriger ou renvoyer erreur :
- Rediriger tous les hôtes non trouvés vers HTTPS (ou vers une page d’erreur)
1 2 3 4 5 6
server { listen 80 default_server; listen [::]:80 default_server; server_name _; return 301 https://$host$request_uri; } - Ou renvoyer 404 directement :
1 2 3 4 5 6
server { listen 80 default_server; listen [::]:80 default_server; server_name _; return 404; }
Remarques importantes :
default_serverfait que ce bloc est utilisé si aucun autre server_name ne correspond.server_name _est une pratique courante pour un nom générique ; vous pouvez aussi utiliserserver_name "~^(.+)$";maisdefault_serverest l’élément clef.- Pour TLS, le bloc catch-all doit définir ssl_certificate/ssl_certificate_key — sinon la négociation TLS échouera avant que nginx puisse renvoyer une page d’erreur. Utilisez un certificat qui couvre votre domaine (wildcard *.rnmkcy.eu) ou un certificat générique valide pour rnmkcy.eu.
- Si vous avez SNI dynamique et plusieurs certificats, assurez-vous qu’un certificat par défaut existe (le certificat présenté si SNI ne correspond à aucun autre serveur).
- Placez ces blocs avant/ après vos blocs spécifiques : l’important est qu’un seul bloc soit déclaré comme default_server sur chaque port. N’en déclarez pas plusieurs default_server sur le même port.
Exemple complet résumé (HTTPS wildcard cert) :
1
2
3
4
5
6
7
8
9
10
11
12
13
14
15
16
17
18
19
# Catch-all HTTPS -> 404
server {
listen 443 ssl default_server;
listen [::]:443 ssl default_server;
server_name _;
ssl_certificate /etc/ssl/certs/domr_eu_wildcard.pem;
ssl_certificate_key /etc/ssl/private/domr_eu_wildcard.key;
return 404;
}
# Exemple de serveur spécifique
server {
listen 443 ssl;
listen [::]:443 ssl;
server_name subdomain1.rnmkcy.eu;
ssl_certificate /etc/ssl/certs/domr_eu_wildcard.pem;
ssl_certificate_key /etc/ssl/private/domr_eu_wildcard.key;
...
}
Après modification, testez la configuration et rechargez nginx :
- nginx -t
- systemctl reload nginx (ou nginx -s reload)
Si vous voulez une page d’erreur personnalisée au lieu d’un simple code, remplacez return 404; par return 404 "<html>...</html>"; ou utilisez error_page 404 /custom_404.html; et servez le fichier approprié.
Voici quelques suggestions concises pour une page HTML d’erreur (404 ou 403) — simple, accessible et adaptée au wildcard subdomain.
1) Structure recommandée (essentiels)
- Titre clair (h1) avec le code d’erreur.
- Message court expliquant l’erreur.
- Boutons/lien utiles : accueil (https://rnmkcy.eu), recherche, contact.
- Indication technique optionnelle (host demandé) pour debug (affiché seulement si utile).
- Design responsive, couleurs lisibles, contraste WCAG.
- Petite illustration ou icône pour humaniser l’erreur.
- Cache-control pour éviter surcaches indésirables (header nginx).
- Fichier statique unique (index.html + CSS inline ou minifié) pour fiabilité.
2) Exemple minimal (fichier /var/www/error_pages/404.html)
1
2
3
4
5
6
7
8
9
10
11
12
13
14
15
16
17
18
19
20
21
22
23
24
25
26
27
28
29
30
31
32
33
34
35
36
37
38
39
40
41
42
43
44
45
<!doctype html>
<html lang="fr">
<head>
<meta charset="utf-8" />
<meta name="viewport" content="width=device-width,initial-scale=1" />
<title>404 — Page introuvable</title>
<style>
:root{--bg:#f7f8fb;--card:#fff;--accent:#0b76ff;--muted:#6b7280}
body{margin:0;font-family:system-ui,-apple-system,Segoe UI,Roboto,"Helvetica Neue",Arial;background:var(--bg);color:#111;display:flex;align-items:center;justify-content:center;height:100vh}
.card{background:var(--card);padding:28px;border-radius:12px;box-shadow:0 6px 24px rgba(20,20,40,0.08);max-width:760px;width:94%;text-align:center}
h1{font-size:48px;margin:0 0 8px}
p{margin:0 0 18px;color:var(--muted)}
.host{font-size:13px;color:#9ca3af;margin-bottom:14px}
.actions{display:flex;gap:10px;justify-content:center;flex-wrap:wrap}
a.button{display:inline-block;padding:10px 16px;border-radius:8px;text-decoration:none;color:#fff;background:var(--accent);font-weight:600}
a.ghost{background:transparent;color:var(--accent);border:1px solid rgba(11,118,255,0.12)}
.illustr{width:120px;height:80px;margin:10px auto 0;opacity:0.95}
</style>
</head>
<body>
<div class="card" role="main" aria-labelledby="title">
<h1 id="title">404 — Page introuvable</h1>
<p>Le sous-domaine demandé n'existe pas ou n'est pas configuré.</p>
<div class="host" id="hostInfo"></div>
<div class="actions">
<a class="button" href="https://rnmkcy.eu/">Aller à l'accueil</a>
<a class="ghost" href="mailto:admin@rnmkcy.eu">Contacter le support</a>
</div>
<svg class="illustr" viewBox="0 0 120 80" aria-hidden="true">
<g fill="none" stroke="#dfe7ff" stroke-linecap="round" stroke-width="6">
<path d="M10 60c20-30 40-30 80-8"/>
<circle cx="20" cy="20" r="6" fill="#fff" stroke="#c7daff"/>
</g>
</svg>
</div>
<script>
// affiche l'hôte demandé (utile pour debug). Désactiver en prod si besoin.
(function(){
var host = location.hostname || '';
if(host) document.getElementById('hostInfo').textContent = 'Hôte demandé : ' + host;
})();
</script>
</body>
</html>
3) Conseils de déploiement
- Placer le fichier (ex. /var/www/error_pages/404.html) et servir avec error_page ou return dans nginx catch-all:
- return 404 /404.html; ou try_files /404.html =404;
- Ajouter en-têtes (dans bloc server nginx) :
- add_header Cache-Control “no-store, no-cache, must-revalidate, proxy-revalidate”;
- add_header X-Content-Type-Options nosniff;
- Ne pas inclure d’informations sensibles (IP interne, chemins, versions).
- Tester sur plusieurs appareils et langues si nécessaire.
Voici un exemple de configuration nginx incluant un serveur catch‑all HTTPS qui sert une page d’erreur statique via error_page, plus un bloc HTTP pour rediriger vers HTTPS. Ajustez les chemins de certificats et du fichier d’erreur selon votre installation.
1
2
3
4
5
6
7
8
9
10
11
12
13
14
15
16
17
18
19
20
21
22
23
24
25
26
27
28
29
30
31
32
33
34
35
36
37
38
39
40
41
42
43
44
45
46
47
48
49
50
51
52
53
54
55
56
57
58
59
# Catch-all HTTPS -> sert /var/www/error_pages/404.html pour les hôtes non trouvés
server {
listen 443 ssl default_server;
listen [::]:443 ssl default_server;
server_name _;
ssl_certificate /etc/ssl/certs/domr_eu_wildcard.pem;
ssl_certificate_key /etc/ssl/private/domr_eu_wildcard.key;
ssl_protocols TLSv1.2 TLSv1.3;
ssl_prefer_server_ciphers on;
root /var/www/error_pages;
index 404.html;
# Définit la page d'erreur et renvoie le code 404
error_page 404 /404.html;
location = /404.html {
internal;
add_header Cache-Control "no-store, no-cache, must-revalidate, proxy-revalidate";
add_header X-Content-Type-Options nosniff;
try_files /404.html =404;
}
# Par défaut, renvoyer 404 pour tout host non reconnu
location / {
return 404;
}
}
# Exemple de server spécifique (existant)
server {
listen 443 ssl;
listen [::]:443 ssl;
server_name subdomain1.rnmkcy.eu;
ssl_certificate /etc/ssl/certs/domr_eu_wildcard.pem;
ssl_certificate_key /etc/ssl/private/domr_eu_wildcard.key;
root /var/www/subdomain1;
index index.html;
# configuration normale...
}
# HTTP -> redirige vers HTTPS (port 80 catch-all)
server {
listen 80 default_server;
listen [::]:80 default_server;
server_name _;
return 301 https://$host$request_uri;
}
# Optionnel : bloc HTTP/80 pour un server spécifique si besoin
server {
listen 80;
listen [::]:80;
server_name subdomain1.rnmkcy.eu;
return 301 https://$host$request_uri;
}
Instructions de test et déploiement :
- Placer votre page d’erreur statique (ex. /var/www/error_pages/404.html).
- Tester la config : nginx -t
- Recharger nginx : systemctl reload nginx (ou nginx -s reload)
Note : le bloc catch‑all en HTTPS doit présenter un certificat valide (wildcard *.rnmkcy.eu ou certificat couvrant rnmkcy.eu) afin que la négociation TLS réussisse avant l’envoi de la page d’erreur.
Modifications
Passer en mode super utilisateur
1
2
3
4
5
6
7
8
9
10
11
12
13
14
15
16
17
18
19
20
21
22
23
24
25
26
27
28
29
30
31
32
33
34
35
36
37
38
39
40
41
42
43
44
45
46
47
48
49
50
51
52
53
54
55
56
57
58
59
60
61
62
63
64
65
66
67
68
69
70
71
72
73
74
75
76
77
78
79
mkdir -p /var/www/error_pages/
cat <<EOF > /var/www/error_pages/404.html
<!doctype html>
<html lang="fr">
<head>
<meta charset="utf-8" />
<meta name="viewport" content="width=device-width,initial-scale=1" />
<title>404 — Page introuvable</title>
<style>
:root{--bg:#f7f8fb;--card:#fff;--accent:#0b76ff;--muted:#6b7280}
body{margin:0;font-family:system-ui,-apple-system,Segoe UI,Roboto,"Helvetica Neue",Arial;background:var(--bg);color:#111;display:flex;align-items:center;justify-content:center;height:100vh}
.card{background:var(--card);padding:28px;border-radius:12px;box-shadow:0 6px 24px rgba(20,20,40,0.08);max-width:760px;width:94%;text-align:center}
h1{font-size:48px;margin:0 0 8px}
p{margin:0 0 18px;color:var(--muted)}
.host{font-size:13px;color:#9ca3af;margin-bottom:14px}
.actions{display:flex;gap:10px;justify-content:center;flex-wrap:wrap}
a.button{display:inline-block;padding:10px 16px;border-radius:8px;text-decoration:none;color:#fff;background:var(--accent);font-weight:600}
a.ghost{background:transparent;color:var(--accent);border:1px solid rgba(11,118,255,0.12)}
.illustr{width:120px;height:80px;margin:10px auto 0;opacity:0.95}
</style>
</head>
<body>
<div class="card" role="main" aria-labelledby="title">
<h1 id="title">404 — Page introuvable</h1>
<p>Le sous-domaine demandé n'existe pas ou n'est pas configuré.</p>
<div class="host" id="hostInfo"></div>
<div class="actions">
<a class="button" href="https://rnmkcy.eu/">Aller à l'accueil</a>
<!--<a class="ghost" href="mailto:admin@rnmkcy.eu">Contacter le support</a>-->
</div>
<svg class="illustr" viewBox="0 0 120 80" aria-hidden="true">
<g fill="none" stroke="#dfe7ff" stroke-linecap="round" stroke-width="6">
<path d="M10 60c20-30 40-30 80-8"/>
<circle cx="20" cy="20" r="6" fill="#fff" stroke="#c7daff"/>
</g>
</svg>
</div>
<script>
// affiche l'hôte demandé (utile pour debug). Désactiver en prod si besoin.
(function(){
var host = location.hostname || '';
if(host) document.getElementById('hostInfo').textContent = 'Hôte demandé : ' + host;
})();
</script>
</body>
</html>
EOF
#
#
cat <<EOF > /etc/nginx/conf.d/_erreur-404.conf
server {
listen 443 ssl default_server;
listen [::]:443 ssl default_server;
server_name _;
include /etc/nginx/conf.d/ssl-modern.inc;
root /var/www/error_pages;
index 404.html;
# Définit la page d'erreur et renvoie le code 404
error_page 404 /404.html;
location = /404.html {
internal;
add_header Cache-Control "no-store, no-cache, must-revalidate, proxy-revalidate";
add_header X-Content-Type-Options nosniff;
try_files /404.html =404;
}
# Par défaut, renvoyer 404 pour tout host non reconnu
location / {
return 404;
}
}
EOF
#
# Recharger nginx
systemctl reload nginx
En cas d’erreur
Erreur docker-compose cwwk
Problème
1
2
3
4
docker compose up -d
[+] up 0/1
⠇ Image containrrr/watchtower:latest Pulling 1.9s
failed to copy: httpReadSeeker: failed open: failed to do request: Get "production.cloudfront.docker.com/registry-v2/docker/registry/v2/blobs/sha256/e7/e7dd50d07b86c380dd53caeb7778da052d1a8fc2c606644a419afa35e9f5691e/data?Expires=1781346969&Signature=Fhsgg8zMJOWMsHnOrfDzkHycScMGbWpnHKdKT~lSXE6~3Rl2h-ucQsHhll4qjEt4YMd~Zd4XqUH2M8hjribzRn3myaV2u0DKxYDLTPsd1E9KriNXW9XEaiXSaYJ3J-n3mAokgXBgMShKkP5IMuKYDRgkIgRKqDb7QVmFj~~USyYmXf2DHh2vx5P2M1UHPWHqY0OjqmtIKugp32vHOIhWsw7QivJFXGgH2dtAeb1e5iPuQEh23p6rJaFj~LTQ6f1W6aKZPmx-9u13IMwM7WlBwWlhJuLGae~AroS-J~BVuhqa2qpRBP~-gneWoQnl6eRlnbcA-l6PU9Dty9AZLJwOYw__&Key-Pair-Id=K2C9XPB6FLAKUF": dial tcp: lookup production.cloudfront.docker.com on 192.168.0.205:53: no such host
L’erreur indique un échec DNS lors du pull de l’image (lookup production.cloudfront.docker.com on 192.168.0.205:53: no such host).
Analyse
yick@alder:~/sharenfs/docker-app$ docker pull containrrr/watchtower:latest
1
2
3
4
5
6
7
latest: Pulling from containrrr/watchtower
1f05004da6d7: Pull complete
57241801ebfd: Pull complete
3d4f475b92a2: Pull complete
Digest: sha256:6dd50763bbd632a83cb154d5451700530d1e44200b268a4e9488fefdfcf2b038
Status: Downloaded newer image for containrrr/watchtower:latest
docker.io/containrrr/watchtower:latest
sudo journalctl -u docker –no-pager
1
2
juin 13 11:52:57 alder dockerd[4771]: time="2026-06-13T11:52:57.087281678+02:00" level=info msg="image pulled" digest="sha256:6dd50763bbd632a83cb154d5451700530d1e44200b268a4e9488fefdfcf2b038" remote="docker.io/containrrr/watchtower:latest"
juin 13 11:52:57 alder dockerd[4771]: time="2026-06-13T11:52:57.105367423+02:00" level=error msg="failed to validate image signature" error="resolving signature chain for image sha256:6dd50763bbd632a83cb154d5451700530d1e44200b268a4e9488fefdfcf2b038: expected image index descriptor, got application/vnd.docker.distribution.manifest.list.v2+json"
docker run –rm busybox nslookup production.cloudfront.docker.com
1
2
3
4
5
6
7
8
9
10
11
12
13
14
15
16
17
18
19
20
21
22
23
24
25
26
27
28
29
30
31
32
33
34
35
36
37
38
Unable to find image 'busybox:latest' locally
latest: Pulling from library/busybox
b05093807bb0: Pull complete
7270b3e1860c: Download complete
Digest: sha256:fd8d9aa63ba2f0982b5304e1ee8d3b90a210bc1ffb5314d980eb6962f1a9715d
Status: Downloaded newer image for busybox:latest
Server: 9.9.9.9
Address: 9.9.9.9:53
Non-authoritative answer:
production.cloudfront.docker.com canonical name = d3ipk8a4rcghwr.cloudfront.net
Name: d3ipk8a4rcghwr.cloudfront.net
Address: 13.249.228.84
Name: d3ipk8a4rcghwr.cloudfront.net
Address: 13.249.228.83
Name: d3ipk8a4rcghwr.cloudfront.net
Address: 13.249.228.76
Name: d3ipk8a4rcghwr.cloudfront.net
Address: 13.249.228.49
Non-authoritative answer:
production.cloudfront.docker.com canonical name = d3ipk8a4rcghwr.cloudfront.net
Name: d3ipk8a4rcghwr.cloudfront.net
Address: 2600:9000:204e:5200:9:4855:aac0:93a1
Name: d3ipk8a4rcghwr.cloudfront.net
Address: 2600:9000:204e:8400:9:4855:aac0:93a1
Name: d3ipk8a4rcghwr.cloudfront.net
Address: 2600:9000:204e:9400:9:4855:aac0:93a1
Name: d3ipk8a4rcghwr.cloudfront.net
Address: 2600:9000:204e:5800:9:4855:aac0:93a1
Name: d3ipk8a4rcghwr.cloudfront.net
Address: 2600:9000:204e:8000:9:4855:aac0:93a1
Name: d3ipk8a4rcghwr.cloudfront.net
Address: 2600:9000:204e:2400:9:4855:aac0:93a1
Name: d3ipk8a4rcghwr.cloudfront.net
Address: 2600:9000:204e:fe00:9:4855:aac0:93a1
Name: d3ipk8a4rcghwr.cloudfront.net
Address: 2600:9000:204e:e200:9:4855:aac0:93a1
docker run –rm –network host busybox wget -qO- https://production.cloudfront.docker.com || true
1
2
wget: note: TLS certificate validation not implemented
wget: server returned error: HTTP/1.1 403 Forbidden
docker run –rm busybox ping -c 3 13.249.228.76
1
2
3
4
5
6
7
8
PING 13.249.228.76 (13.249.228.76): 56 data bytes
64 bytes from 13.249.228.76: seq=0 ttl=250 time=8.248 ms
64 bytes from 13.249.228.76: seq=1 ttl=250 time=8.304 ms
64 bytes from 13.249.228.76: seq=2 ttl=250 time=7.691 ms
--- 13.249.228.76 ping statistics ---
3 packets transmitted, 3 packets received, 0% packet loss
round-trip min/avg/max = 7.691/8.081/8.304 ms
cat /etc/docker/daemon.json
1
2
3
{
"dns": ["9.9.9.9", "1.1.1.1"]
}
cat /etc/resolv.conf
1
2
3
search 192.168.0.0/24
nameserver 192.168.0.205
nameserver 1.1.1.1
Le pull a finalement réussi — l’erreur initiale venait d’un problème ponctuel de résolution depuis le daemon. Le journal montre toutefois une erreur secondaire non bloquante concernant la validation de signature
failed to validate image signature … expected image index descriptor, got application/vnd.docker.distribution.manifest.list.v2+json
Explications et actions recommandées (concises) :
1) Erreur de signature
- Cause : le démon essaye de valider une signature d’image (notary/TUF/rekor/signature policy) mais rencontre un manifest de type “manifest list” (multi-arch) attendu différemment. C’est généralement inoffensif si l’image a bien été téléchargée (Status: Downloaded newer image).
- Action : si vous n’utilisez pas une politique d’attestation/signature stricte, vous pouvez ignorer. Sinon vérifiez la configuration de la signature d’images (cosign/notary/notation) sur le daemon.
2) DNS et configuration
- Votre daemon utilise bien 9.9.9.9/1.1.1.1 (daemon.json) ; /etc/resolv.conf garde en second 192.168.0.205 — OK.
- Tests réseau (nslookup/ping/wget) indiquent que la résolution et la connectivité vers CloudFront fonctionnent. Le 403 sur https://production.cloudfront.docker.com via wget est normal (CloudFront n’autorise pas l’accès HTTP direct sans bon Host/chemin).
3) Prochaines étapes pratiques
- Lancer docker compose up -d à nouveau (image déjà localement présente) : docker compose up -d
- Surveiller logs : docker logs -f watchtower
- Si l’avertissement de signature vous gêne et que vous n’avez pas de système de signature : vérifiez et désactivez les réglages d’attestation dans votre stack (cosign/notation/notary) ou mettez à jour ces outils; sinon laissez tel quel.
Configuration réseau avec bridge (OPTION)
Configurer un serveur Debian avec :
- Une IP statique sur
enp3s0pour l’hôte. - Un pont réseau
br0surenp4s0pour les VMs.
1. Fichier /etc/network/interfaces
1
2
3
4
5
6
7
8
9
10
11
12
13
14
15
16
17
18
19
20
21
22
23
24
25
26
27
28
29
30
31
32
33
source /etc/network/interfaces.d/*
auto lo
iface lo inet loopback
# Réseau principal de l'hôte
allow-hotplug enp3s0
iface enp3s0 inet static
address 192.168.0.205
netmask 255.255.255.0
gateway 192.168.0.254
iface enp3s0 inet6 static
address 2a01:e0a:95a:e2f1::1
netmask 64
gateway fe80::8e97:eaff:fe39:66d6
# Port physique du bridge pour les VMs
allow-hotplug enp4s0
iface enp4s0 inet manual
# Bridge pour le réseau des VMs
auto br0
iface br0 inet static
address 192.168.10.100
netmask 255.255.255.0
pre-up ip link set br0 down 2>/dev/null || true
pre-up ip addr flush dev br0 2>/dev/null || true
pre-up ip link delete br0 2>/dev/null || true
bridge_ports enp4s0
bridge_stp off
bridge_fd 0
bridge_maxwait 0
2. Vérifier les interfaces
1
2
3
4
ip addr
ip link show br0
ip addr show br0
ip route
3. Supprimer un br0 résiduel (si nécessaire)
1
2
3
sudo ip link set br0 down
sudo ip addr flush dev br0
sudo ip link delete br0
Puis relancer le réseau :
1
sudo systemctl restart networking
4. Redémarrer le service réseau
1
sudo systemctl restart networking
Vérifier le statut :
1
systemctl status networking
5. Vérifier la connectivité
1
2
ping -c 3 192.168.0.254
ping -c 3 192.168.10.1
6. Points importants
enp4s0doit être enmanual, sans adresse IP, car il est utilisé commebridge_ports.br0porte l’adresse du réseau des VMs, mais n’a pas degatewaypour éviter un conflit de route par défaut.- Si
br0existe déjà quandifuptente de le créer, il faut le supprimer manuellement ou ajouter les lignespre-uppour le nettoyer automatiquement. - Un redémarrage complet de la machine évite la plupart des problèmes d’état résiduel des interfaces.